Email Support | Mon - Fri: 9am - 5pm Sun: 12pm - 4pm CT | Call Support: 312-775-7009

Which X-Carve is Right for You? Learn More.

Mosaic Tile

73 likes
0 opens
0 copies
26 comments
Jeff Solin

Project by

Jeff Solin

General Information

The beauty of this project lies in the number that are made :) The overall idea is to have many people (students, co-workers, etc) make their own tile as an introduction to using the X-Carve or Carvey, then put all of the finished tiles together into a large mosaic.

Like this project Open in Easel®
Material Description Price
Mosaic Tile Kit for Schools

Mosaic Tile Kit for Schools

60 Tiles (5 each of 12 color combinations) - not used

1

Prepare and clamp down material

3 minutes

The material included in this project is marked as 12″ × 12″, however it is slightly smaller in both directions, roughly 11.875″ × 11.875″. Chop saws work great with HDPE and taking into account the thickness of the saw blade along with a clamped stopper to repeat the same cuts, you can get nearly perfect squares. Each piece of material ordered can be used to make 4 tiles.

Start by clamping your material down to the wasteboard. Be sure you not placing a clamp on the bottom left “home” corner since that is where the bit will start.

2

Check for red marks in the preview

2 minutes

Check to see if there are any red marks on your design. This can mean two things, 1) a corner isn’t going to be as sharp as you may expect due to the roundness of the bit that is cutting, or 2) the bit is too big to carve as thin of a line as your design requires.

3

Check the toolpaths

2 minutes

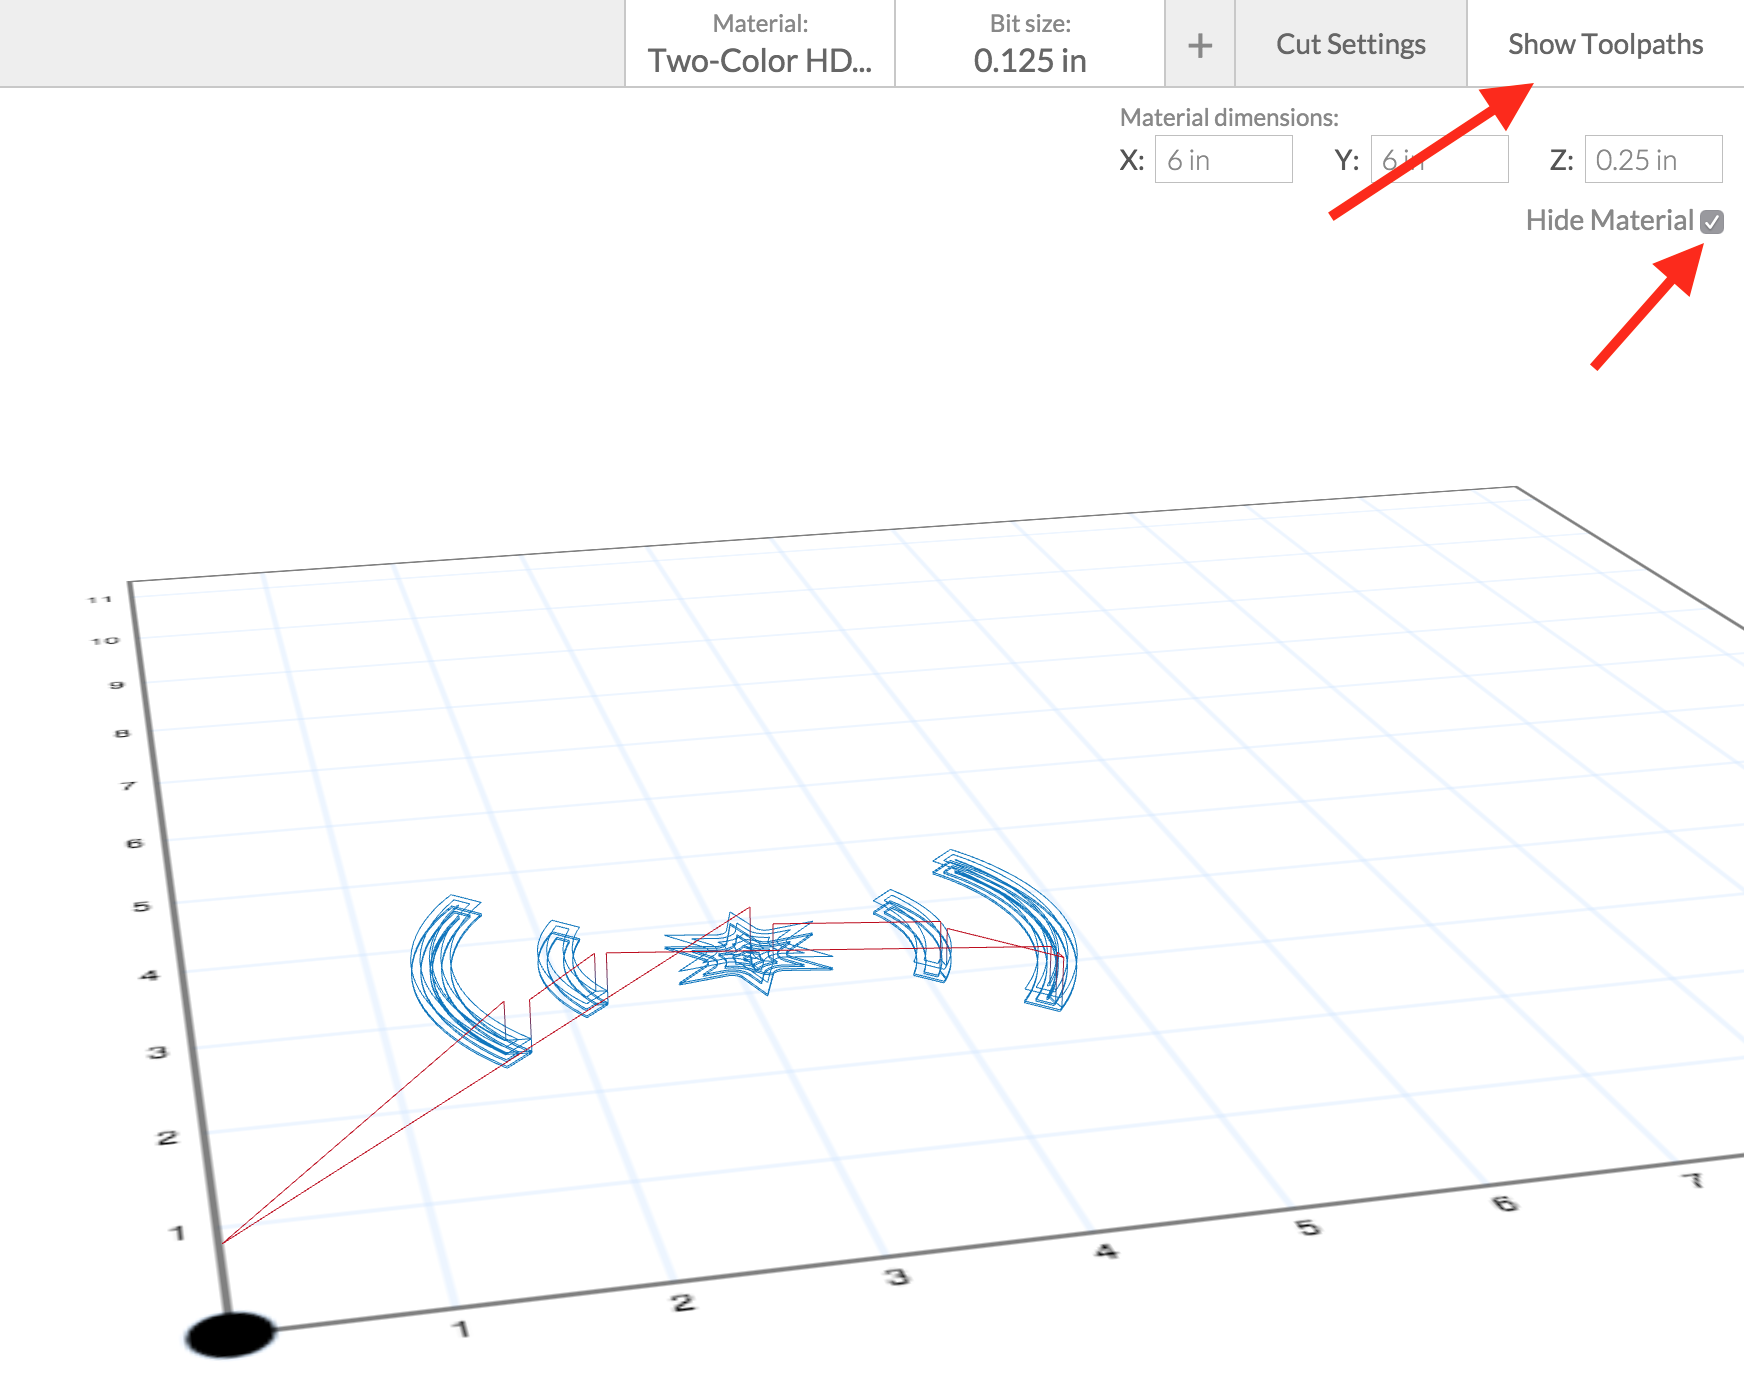
Check to make sure that the red marks do not cause any key design elements to be removed from the carving. Simply click the Toolpaths button and click the “Hide Material” checkbox to see exactly where the bit will travel. Make sure that the bit is going everywhere that you expect and that fine detail areas important to your design aren’t missing. In this example design, you can see that the corners of the star may be less sharp than expected, which is not critical for this carving.

4

Note about settings

1 minute

This project is designed to be done by many people such as students in a class. The Depth Per Pass in the linked Easel project is set to get through the top layer of the HDPE in a single pass. This is for logistical purposes where a teacher may need to keep the carving time to a minimum for each student job. The top layer of the two-color HDPE is approximately 0.05" and based on slight variations the Depth Per Pass was set to 0.075". This works well for an X-Carve with the Quiet Cut Spindle. When I ran this project with my students, they were required to keep their carves to 0.075" or less so that the entire job could be run in a single-pass. This greatly shortened the time needed for each student to complete a carving.

Greg Kent
Hi Jeff, This project is great. What bit did you use for this project?
Greg Kent
Jeff Solin
Thanks Greg! I used an 1/8" bit (either upcut spiral or straight flute work). Part of the design of this project was in the constraints. I wanted to logistically be able to have many kids complete the project, but not have it totally open ended (I save that for follow-up projects).
Jeff Solin
Ethan Lucas
Jeff Fellow teacher here. I'd love to chat more about this project with you! How many students do you have? Is it possible to do with 80-90? What do the kids do during all the down time If one can carve at a time?
Ethan Lucas
Jeff Solin
(Start) Hi Ethan! I have 120 students that take this class in 4 classes of about 30. In my lab, we have multiple machines to use which helps with logistics of so many students.
Jeff Solin
Jeff Solin
I have a Google Form that I guide the first group through that has a series of checks / steps along the way then an approval box that I check before carving begins.
Jeff Solin
Jeff Solin
Then when those students complete their tiles (usually one set of students / tiles per class), they are responsible for helping the next group through the process. So every student (except the last to go) guide other students through the project with me giving the final go-ahead.
Jeff Solin
Jeff Solin
When student are done and dealing with down-time, I have them explore more advanced features of Easel. I give ample design time to all students then select at random who is up for carving. Hope that all helps! (End)
Jeff Solin
J Santilli
What program are you using to do some of the artwork, all in Easel?
J Santilli
Jeff Solin
Mostly Easel and Illustrator (or Inkscape).
Jeff Solin
Ethan Lucas
How did you hang them up on the wall?
Ethan Lucas
Jeff Solin
Great question. I was just working on this yesterday. My plan is to attach them to a 4x8' sheet of white acrylic coated hardboard from HD (which I've been using a lot) https://goo.gl/Op10dI. Just need to figure out best adhesive. Leaning towards epoxy but up for ideas.
Jeff Solin
katharina Boser
I'm wondering if this can be done with a hard wood/particle board material. just trying to decide what material on the list in easel is closest--its pretty hard but softer than the plastics of course.
katharina Boser
Jeff Solin
Hi Katharina. Yep! In fact that's how I did it the first time around. Pros: cheaper, and multiple depths looks cool. Cons: tons more dust for X-carves (not an issue for Carvey).
Jeff Solin
Gallery 272
Hi Jeff, I think this is a great concept!! I am going to start having local workshops in my shop with my family, friends, neighbors and eventually the community. This is another great idea that we can implement into our workshops. P.T. More - Gallery 272
Gallery 272
Gallery 272
Where did you come up with, get or buy most of the designs? Do you have a bunch of SVG files that they pick from or do your students bring a design or create one from inside Easel? P.T. More
Gallery 272
Jeff Solin
P.T., that sounds awesome! As for the designs, my first year running it I let kids image scan / import svg files from anywhere. This year, I've challenged them to design from scratch in Illustrator / Inkscape / Easel. No import of other's work.
Jeff Solin
Christopher Drake
I like it very much. I would like to see this at home
Christopher Drake
Claire Divas
Your designs are awesome. Regards: https://www.mosaictilecenter.com/
Claire Divas
Jeff Solin
Thanks Claire!
Jeff Solin
Gabriel Quiliza Hayes
This project is amazing Jeff!!!
Gabriel Quiliza Hayes
Jeff Solin
Thanks Gabriel!
Jeff Solin
Ben Van Dyke
Hey Jeff, loving this project and hoping to try it out with my students ASAP. Wondering if you have any links to lesson plans and/or the Google Form you mentioned above. Trying to figure out ways to pace this experience out over 5 lessons.
Ben Van Dyke
Jeff Solin
Hi Ben! I don't have specific lesson plans for it, but I'm happy to share the form I mentioned. It's more for how I have students use the x-carves in general. The google form is locked to our domain, but I saved it as a PDF so you (and anyone else) can reference as needed. http://bit.ly/2UzoiBT
Jeff Solin
Ben Van Dyke
Thanks so much Jeff!
Ben Van Dyke
Jonathan
Great Project. Question? How did you mount them on the wall. (concrete block)?
Jonathan
Jeff Solin
Thanks Greg! For mounting, I just used an adhesive like liquid nails to glue to a 1/2" piece of plywood. I've also seen people use something like command strips or double sided tape to put them directly on a wall. Command strips can get pricey depending on how many tiles there are.
Jeff Solin