Email Support | Mon - Fri: 9am - 5pm Sun: 12pm - 4pm CT | Call Support: 312-775-7009

Which X-Carve is Right for You? Learn More.

Marksman Mods 1000mm Shapeoko

Sean Semple

Project by

Sean Semple

General Information

Designing an “All In” shapeoko 2 build, in the spirit of doing it right the first time. Featuring Nema 23 motors, a TinyG, a Quiet Cut Spindle, homing and limit switches,and a 1000mm workplane. Coolant is on the drawing board.

Like this project
Material Description Price
Aluminum GT2 Pulley - 20 Teeth, Dual Flange - 20 mm Pitch

Aluminum GT2 Pulley - 20 Teeth, Dual Flange - 20 mm Pitch (×3)

Bore: 1/4 in - 2013 - 2019, Belt Width: 6 mm

Aluminum Spacers - #12, 5M

Aluminum Spacers - #12, 5M (×2)

Inside Dia.: .219 (5.56mm), Length: 0.25 in, Outside Dia.: .375 (9.53mm)

$5.98

Button Head Cap Screw

Button Head Cap Screw (×2)

Length: 20mm, Quantity: 10, Thread Size: M5

$4.98

Carbide V-Bits

Carbide V-Bits

Shank Diameter: 1/4 in, Cutting Diameter: 1/2 in, Tip Angle: 90 Degree

$15.77

Carbide V-Bits

Carbide V-Bits

Shank Diameter: 1/4 in, Cutting Diameter: 1/2 in, Tip Angle: 60 Degree

$15.91

Desktop 3D Carving (CNC Mill) Kit - Shapeoko 2

Desktop 3D Carving (CNC Mill) Kit - Shapeoko 2

Mechanical kit (requires you provide electronics, pulleys, belts, and M3 hardware to function)

$300.00

Enclosed Power Supply

Enclosed Power Supply

Output Voltage: 48VDC - 2014 - 2017, Current: 7.29A, Power: 350W

Enclosed Power Supply

Enclosed Power Supply

Output Voltage: 24VDC - 2013 - 2017, Current: 10A, Power: 240W

End Mill Sample Pack, 1/8 in Shank

End Mill Sample Pack, 1/8 in Shank (×2)

Quantity: 5 (mix of 3 different types), Shank Diameter: 1/8 in, Cutting Diameter: 1/8 in

ER11-A Collets and Nuts

ER11-A Collets and Nuts

ER11-A Collet 4.5mm

$8.17

ER11-A Collets and Nuts

ER11-A Collets and Nuts

ER11-A Collet 1/4in

$7.17

Flat Washer

Flat Washer (×2)

Finish: Zinc Plated, Dimensions: I.D: 3.2mm; O.D: 7mm, Quantity: 10

$4.00

Flat Washer

Flat Washer (×2)

Finish: Zinc Plated, Dimensions: I.D: 5.3mm; O.D: 10mm, Quantity: 10

$5.98

GT2 Belting - Open Ended - 4 Meters

GT2 Belting - Open Ended - 4 Meters (×15)

Width: 6.35mm - don't use, Pitch: 2mm - don't use

Hex Nuts

Hex Nuts

Height: 2.4mm, Pitch: 0.5mm, Quantity: 10, Width: 5.5mm, Thread Width: M3

Knurled Aluminum Knob

Knurled Aluminum Knob

With crank

MakerSlide - Black Anodize - 5M Tapped

MakerSlide - Black Anodize - 5M Tapped (×4)

Length: 1000mm - 2012 - 2019

Microswitch

Microswitch (×6)

Type: Microswitch

$15.00

Quiet Cut Spindle

Quiet Cut Spindle

Power: 300W, Voltage: 48VDC

Socket Head Cap Screw - Packs of 10 each

Socket Head Cap Screw - Packs of 10 each (×2)

Length: 8mm - 2012 - 2019, Quantity: 10, Thread Size: M3

Socket Head Cap Screw - Packs of 10 each

Socket Head Cap Screw - Packs of 10 each

Length: 12mm - 2012 - 2018, Quantity: 10, Thread Size: M3

Spindle Speed Controller

Spindle Speed Controller

DC Spindle Speed Controller

$35.00

Stepper Motor - NEMA 17

Stepper Motor - NEMA 17

Lead Time: In stock, Holding Torque: 62 oz/in

Stepper Motor - NEMA 23

Stepper Motor - NEMA 23 (×3)

Holding Torque: 140oz-in - 2013 - 2014, Qty: 1, Machine: non-X-Carve

Stepper Motor Cable

Stepper Motor Cable (×25)

Length: 1 ft, Category: Accessory, Type: Cable

Terminal Block

Terminal Block (×4)

Positions: Terminal Block 4

$19.96

TinyG CNC Controller

TinyG CNC Controller

Type: CNC Controller, Version: v8

Waste Board with Threaded Inserts

Waste Board with Threaded Inserts

Size (approx): 1000mm 1000mm 3/4" MDF, Inserts: M5 Qty 144

Wood Clamp Set

Wood Clamp Set (×2)

Type: Clamping System 1, Qty: 4 - don't use

This project's Bill of Materials is not complete.

$437.92
from Inventables

File Description Unit Price

Hello World Fix.nc

The Large Scale Hello World for the MMods 1m Shapeoko 2.

$0

Download Zip

$0
from Inventables

1

Step 1: Stock Assembly

Read the notes in digital files, then start assembly.
Follow the Shapeoko Assembly Instructions as per standard, however replace the larger pieces of alu. extrusion on the bottom with the mechanical kit’s included makerslide, and use the end plates’ out most holes for mounting. Do not put the machines fully together, but keep the main assembly parts ready (gantry carriage, gantry rail, and Y rails.) Be sure to follow any instructions included with the parts like the clamps and wasteboard.

2

Step 2: Carefully Tap the Microswitches

Take an M3 tap, and almost glacially slowly tap the small holes found on the microswitches.

NOTE: This can crack the switch if you are too fast or not straight, rotate the tap at around 1rpm and listen for creaks.

NOTE 2: This configuration is very, VERY fragile, only do if you already know your machine wont obliterate the switches like mine did.

3

Step 3: Attach switches to the motor plates.

Attach the switches with the newly threaded holes in the small elongated slot on either side of the motor plates, use 2 per axis. You’re on your own for the Z axis but it is doable.

4

Step 4: Make the 2 500mm makerslides 1 1000mm support maker slide.

This step is a little ghetto, so bare with me.

Take 2 pieces of 1/4" rod, minimum 8 inches long and slide it into the channels of the maker slide, leave the front most one empty, for the waste board attaches there. Everywhere else should have a rod in it. Do this for both the front and back “supports”.

5

Step 5: Finish the assembly.

Mount the spindle assembly back on the Z axis if you took it off or put it on in the first place, then put the gantry carriage onto the X axis dual-slide. Then take the sub gantry and slide it onto both pieces of Y axis rail. Before closing the Y rail off, fire 2 M5 insertion nuts down the maker slide on the side of the limit switches. Then bolt the Y rail closed and level the machine. Once that is complete and your belts can move the machine without slipping (test this by moving it back and forward with your hand) take some M5 screws and place them in the maker slide insertion nuts to act as stops for the limit switches. Then place some screws in the available holes along side the X axis limit switches on the Y plates to they have something to hit as well. 25mm M5s or longer will work.

6

Step 6: Motor Wiring

Wire the motors as you see fit with the lengths of 4 conductor wire, if your X axis has wire droop like mine did see the next step. Be sure to give yourself plenty of slack on the wires.

7

Step 6b: Anti Wiredroop design.

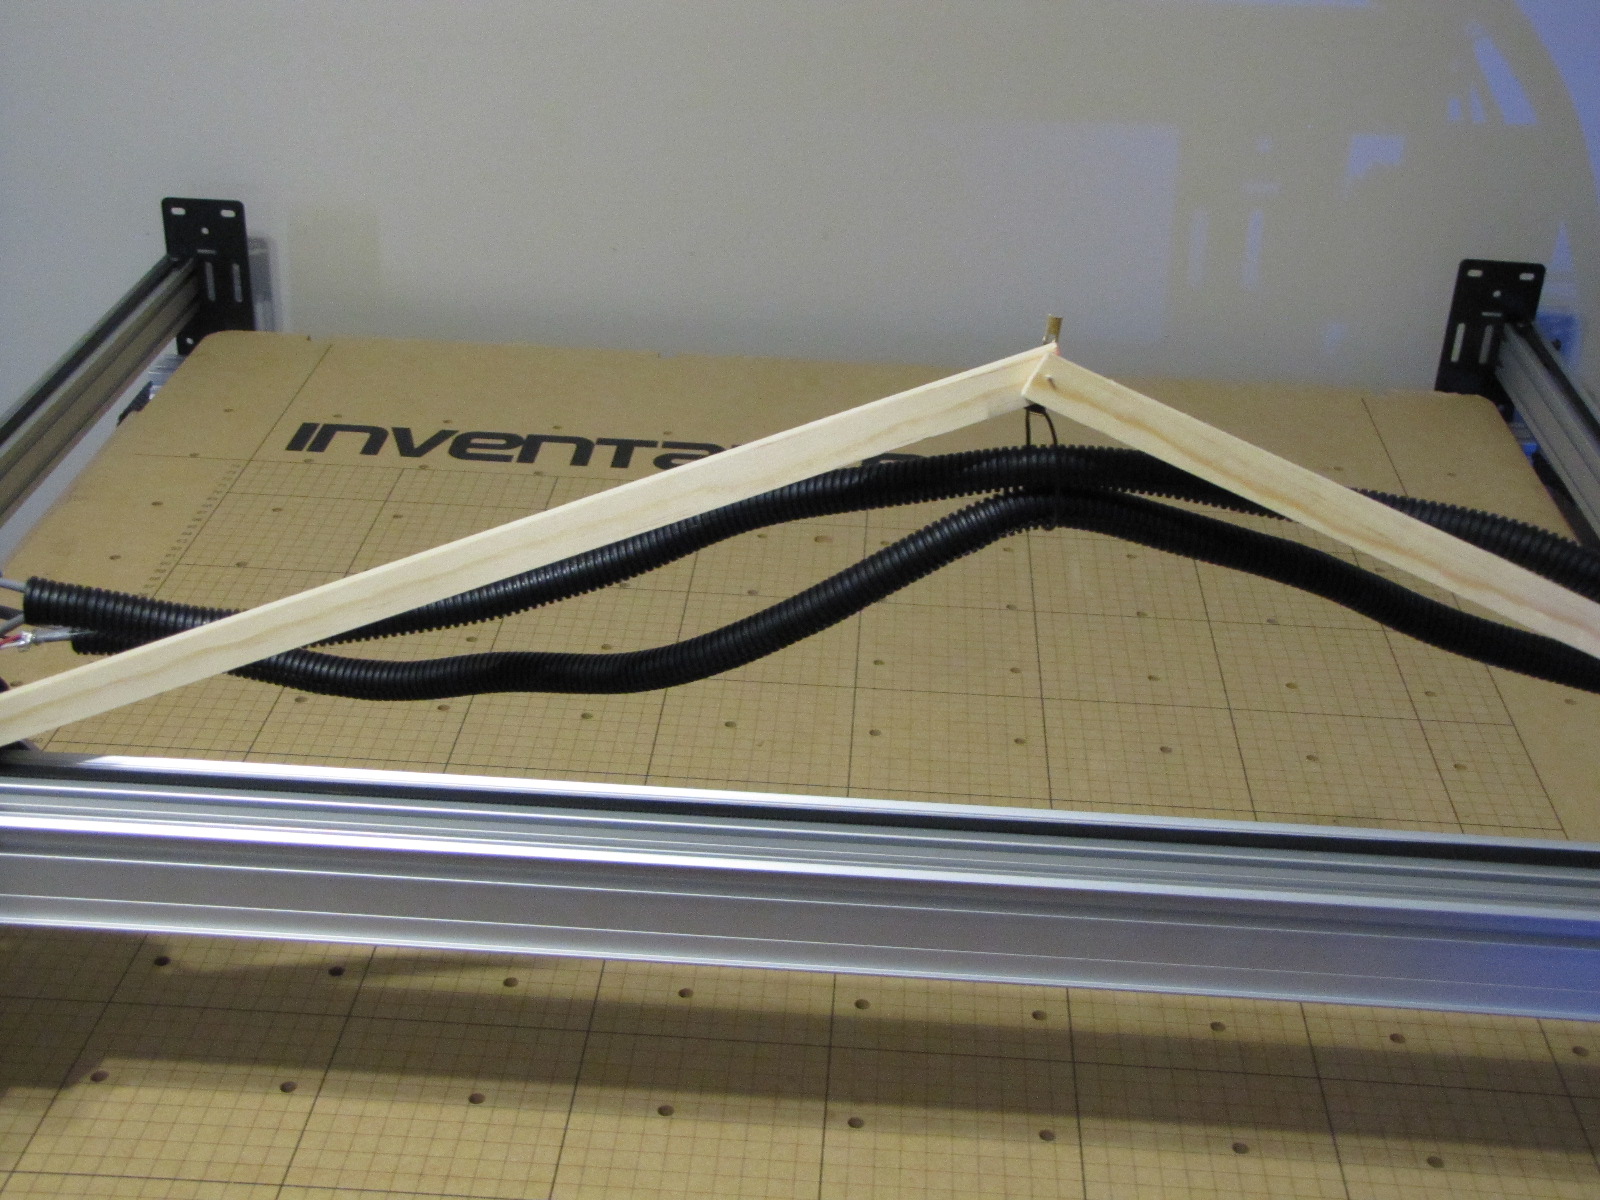
Get some plastic tubing, a small piece of balsawood at least feet long and cut it in half, then nail the halves together at each end, then rotate the boards until they pivot freely around the nail, like a pivot. Run the X axis and Z axis wires through the plastic tube then rig something to hold the tube up at the pivot, I used a picture hook and a ziptie. Bolt one end of the V shape of wood to the X gantry and tie the other end to the Y axis plate. Pictures will follow.

8

Step 7: Wire the tinyG.

Wire the 24v to the tinyG, and the motors. Be sure you know which motor is which, as they proceed in number from right to left. (EG Motor 4 3 2 1). Wire the 2 y motors the same way, we will swich one’s polarity later on.

9

Step 8: Wire the limits.

Wire the limit switches, us the NC pinset on the switches, and use the GROUND pin and the corresponding switch position pin on the tinyG. The Z axis does not have mounting space for a minimum switch, so either design one later or skip it. Pictures to follow.

10

Step 10: Install TGFX and boot the machine.

Follow the initial setup steps on the tinyG wiki, using cool term to verify your tinyG functionality and setup the serial emulation for the controller. Then start entering settings to the machine, be warned, this step will need to be repeated more than once, because either you will enter the wrong settings, or the machine will forget them later. So save your numbers.

11

To be continued.

TinyG config settings, elevation table build, Estop, and large scale hello world to come.

Kristopher Reaves
I don't see any extension to the standard 500mm rails. How are you accommodating the 1m board?
Kristopher Reaves
Sean Semple
@Kristopher Reaves The 500mm maker slides are joined together at the front and back. Maker slide is basically 20mm x 40mm extrusion with an extra extrusion.
Sean Semple
Charles W
I'm new to all of this, so don't laugh! Why are there two power supplies listed? Do you have a wiring diagram that is readily available (for this setup)?
Charles W
Sean Semple
@Charles Andrew Whitledge We all were at one point mate don't worry. One is for the motors and control board, the other is for the spindle. I don't have one handy but I will reinstall express SCH and whip one up tonight for you.
Sean Semple
Daniele N.
another newbie here :) There a note saying : "This project's Bill of Materials is not complete". Is there something missing in the list to get all the parts for this project ? Also, does it come 220V compatible ?? Thanks
Daniele N.
Sean Semple
@Daniele N. the project is operational in its current state. I left the BOM open in case I add upgrades, like the acme Z axis kit or improved limit switches. The project is inherently 220v compatible. Both power supplies have 110/220v switches on them :) All you gotta do is flip the switches.
Sean Semple
Roniel Guzman
hi @SeanSemple, Newbie here, this BOM is all I'll need to make a Shapeoko 2 1000mm x 1000m?
Roniel Guzman
Sean Semple
hey @Roniel Guzman yes sir, everything's there. Even includes extra tooling, limit switches, and the clamping system. However if you can spare the extra change, I would double up the wire amounts. I had to go buy wire after getting it setup.
Sean Semple
Shane Yakely
1. How is this set up working for you? 2. Would cutting down the rails and belts be a bad idea? my goal: 400mm square build area. Thanks for this BOM, saved me some time. Appreciate your experience sharing. sy
Shane Yakely
Sean Semple
@Shane Yakely Loving every minute of it. Z axis acme under consideration. I only used those sizes because it was easiest.. If you change the size you will have to use a custom waste board, custom rail sizes, and custom brace sizes (the bottom bars), if that's acceptable do it.
Sean Semple
Dustin Holden
How does the final build compare to the "1000mm x 1000mm Shapeoko upgrade kit"? I'm starting from scratch and just wondering if I should go with this or the other for the best result.
Dustin Holden
Sean Semple
@Dustin Holden The cost difference is the key part, but for the extra money you get smoother acceleration, limit switches, homing switches, more clamps and tools, Nema 23 motors, and the quieter, more precise speed controlled spindle.
Sean Semple
Rick Gessner
I am ready to purchase my machine... i want a 1M machine... your response above is a little confusing as the combination of the "works" kit and the 1M upgrade are more expensive than this kit... so... do i buy this kit or the Works kit and the 1M upgrade? which one has the features above?
Rick Gessner
Sean Semple
@Rick Gessner My machine design has those features listed above.
Sean Semple
Rick Gessner
Thank you... (that's what i figured, just wanted to be sure)
Rick Gessner
Manuel Huerta
Newbie here, does the TinyG controller replaces Arduino + gShield?, noticed in the 1M x 1M Shapeoko upgrade kit they have Aluminum Extrusion(20x20mm)1500 & 1000 long + Bracket(Gusset), and here you don't, why is that?, last what happens if I only get one Power Supply, is it possible? Thanks!
Manuel Huerta
Sean Semple
@Manuek Huerta: Yes indeed.The tinyG does replace it. I built a dedicated bench instead of a frame. However in my machine a step not shown is using a scrap piece of extrusion from the left over parts and some pennies to support the center. And you need both PS.
Sean Semple
Sean Semple
Also guys Im sorry there's a character limit, I can't write all I'd like to :(
Sean Semple
Manuel Huerta
Awesome!, thanks Sean.
Manuel Huerta
Manuel Huerta
@Sean Semple: what are the differences or benefits between the TinyG Controller and the Arduino+gShield? which is better? why?, sorry for all the questions.
Manuel Huerta
Sean Semple
@Manuel Huerta simply it has PWM speed control vs ON/OFF control for spindle, better acceleration control, and more channels for motors (or Axis if you prefer), also I prefer TGFX/Chillipepper to universal gcode sender.
Sean Semple
Johnny Rodriguez
@Sean Semple Hey Sean thanks for this build, I'm new at this. I added your BOM to my cart and do not see the Nema 23 Motors. Trying to order right now but I am stuck because of this issue. Do I manually add the Nema's? Which motor is compatible the 262oz or 140oz/Dual Shaft?
Johnny Rodriguez
Sean Semple
@Johnny Rodriguez No problem mate. You should add the nema 23 motors you desire to use manually. The ones I used are no longer available. Both are compatible but be advised that the 262oz motors take more power to use, and are larger so they will stick out further from the machine.
Sean Semple
Ryan Leung
Hi Sean, just got a version of your BOM for my setup and am working on putting it together. In step 4 you mention 1/4" rods to adapt the 500mm maker slides into supports, where did you get the rods? do they fit snug into the slides? They’re not threaded so is there play in them on your setup?
Ryan Leung
Sean Semple
@Ryan Leung Hey mate sorry they came from a local home deopt, they arent threaded and are reasonlably snug, with the wasteboard also holding the slides in position as well. They aren't truly necessary but I recommend them just for a bit of extra rigidity.
Sean Semple
Mario Poliquin
I sean Newbie here ! Where did you buy chillpepper program to used it ? finaly you buy nema 17 for gender and nema 23 for other axes ?
Mario Poliquin
Christopher Miller
Is the waste board made out of mdf and if so do you thank is is is it better to buy it locally for less and not have to pay the extra shipping cost or just get the one on the list ? Thanks
Christopher Miller
Sean Semple
@Mario poliquin: Its free from the tinyG makers. Nema23s for everywhere but Zaxis. @Christopher Miller: Buy this one and have one 100% guaranteed to fit perfectly AND have threaded nuts too, plus the nice grid, or DIY it and save probably 70% of the cost.
Sean Semple
Christopher Miller
First of all thank you for the quick response to my first question it is very much appreciated. I have second question. Is the the spindle listed capable of cutting through aluminum or would I get an off the shelf router. Thanks
Christopher Miller
Sean Semple
it is capable of it at lower than optimal speeds. To get to the best speeds, an industry machine is your best bet. IIRC Inventables rates it at 5in/min safely, the shapeoko wiki may have more details.
Sean Semple
Julian Tokarev
@ Sean Semple: Hi, I am as new as they get. Looking for a 1m by 1m machine and this looks like the best bet. Will I still able to use the Easel software for your build though?
Julian Tokarev
Sean Semple
@Julian: Short Version: No. Long Version: Yes with some extra steps. TinyG compatibility is coming, and until then you can download Gcode from the Easel interface.
Sean Semple
Jacob Van de Putte
Is the Shapeoko 2 upgrade kit simply the X-Carve plates and nothing more therefore making it not necessary to upgrade to 1000mm work area?
Jacob Van de Putte
Sean Semple
@Jacob Kindof. The plates for the Xcarve are upgraded for rigidity, nothing else. It isn't necessary as an upgrade but as far as I know it is replacing the shapeoko 2 so eventually it will become standard. I have made the Xcarve conversion already, the ACME axis was too tempting.
Sean Semple