
Sasha Neri
Chicago, IL
Make a one of a kind keychain, even if your name is Smith!
Using Inkscape, you’ll type out your name, rearrange it, and fabricate it on a laser cutter.
Start by setting up your workspace.
File > Document Properties
In General, select Inches from the drop down. This helps later so you know how big your keychain is.
Using the Text Tool, type out the word for your keychain.
Text > Text and Font, or, Shift + Control + T, pulls up the text editor.
Take a minute and pick out your font face.
Our next steps will make the font face unchangeable, so make sure you like it!
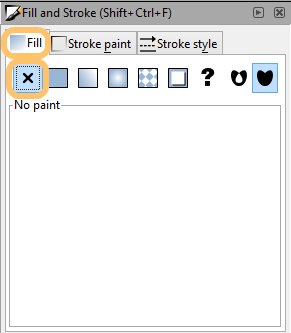
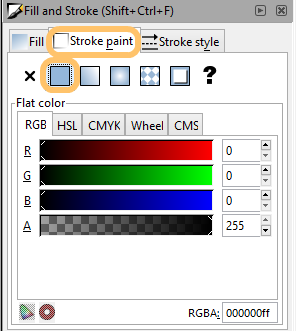
With your word selected, click Object > Fill and Stroke. Turn off Fill, Turn on Stroke. This allows you to see your outline a little easier. Later we will adjust stroke width for the laser cutter.
Now that you have selected your font, make sure your word is selected. Go to Path > Object to Path. Go to Object > Ungroup.
You should know have a dashed line around each letter.
You will start rearranging your letters.
Overlap is good. The more overlap, the sturdier your keychain will be.
You can select which letter you’re working with by clicking along its line. Click a second time to activate the tilt/skew features. You’ll see the arrows around the letter change. Hover over a corner. It will turn green. Click and drag to tilt your letter.
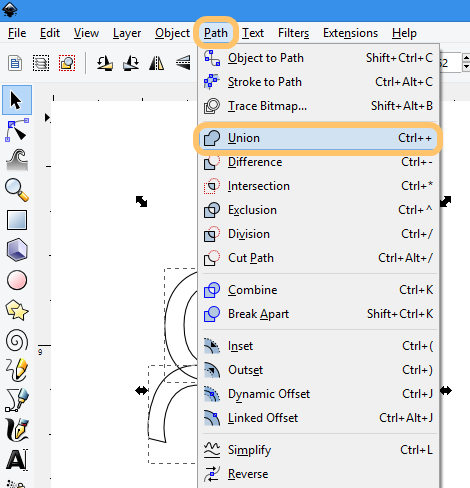
When you’re done rearranging, go to Edit > Select All, then Path > Union. You should see all of your intersecting lines disappear.

Click on your design. You’ll see the width and height just above the ruler. Click on the lock to keep your design proportional. Compare the current width and height, and whichever is larger, rewrite to 3.5 (inches).
Now that your keychain is keychain-sized, go to Object > Fill and Stroke. For Stroke width, select 0.003 inches. (If the line is thinner than 0.003 inches, Retina Engrave has a hard time “seeing” it.)

Round, closed letters make an excellent, natural keyring hole. If you do not have any of these, or would rather have a separate hole, add a circle near an edge of your design. The circle should be .180 inches in width and height.
Group your objects and take your design to the computers at the laser cutters!


