
Wenray Wang
Sydney, Australia
Chess board and pieces created on the X-carve, moulded, and then cast from concrete. I love working with timber on the X-Carve, but there’s just something to concrete – the weight, texture, feel – which can add so much more character to a project.
As a long time fan of the game I’ve been keen to make a chess set ever since I’ve owned an X-Carve. I generally don’t like making objects on the CNC which could be made using another fabrication method such as on a lathe. Typically circular chess pieces fall into this category, but I decided to make an exception.
Now, I have several friends who play chess, so I was keen to make a few sets as gifts. But after modelling the pieces and creating the toolpaths, I ended up with some significant carve times for just one side of 16 pieces (+2hrs), not to mention the sanding time required if I made the sets in timber. Moulding the pieces in silicone then casting them in concrete seemed to be the better approach in terms of repeatability. I also love the unique handmade quality of concrete in object design.
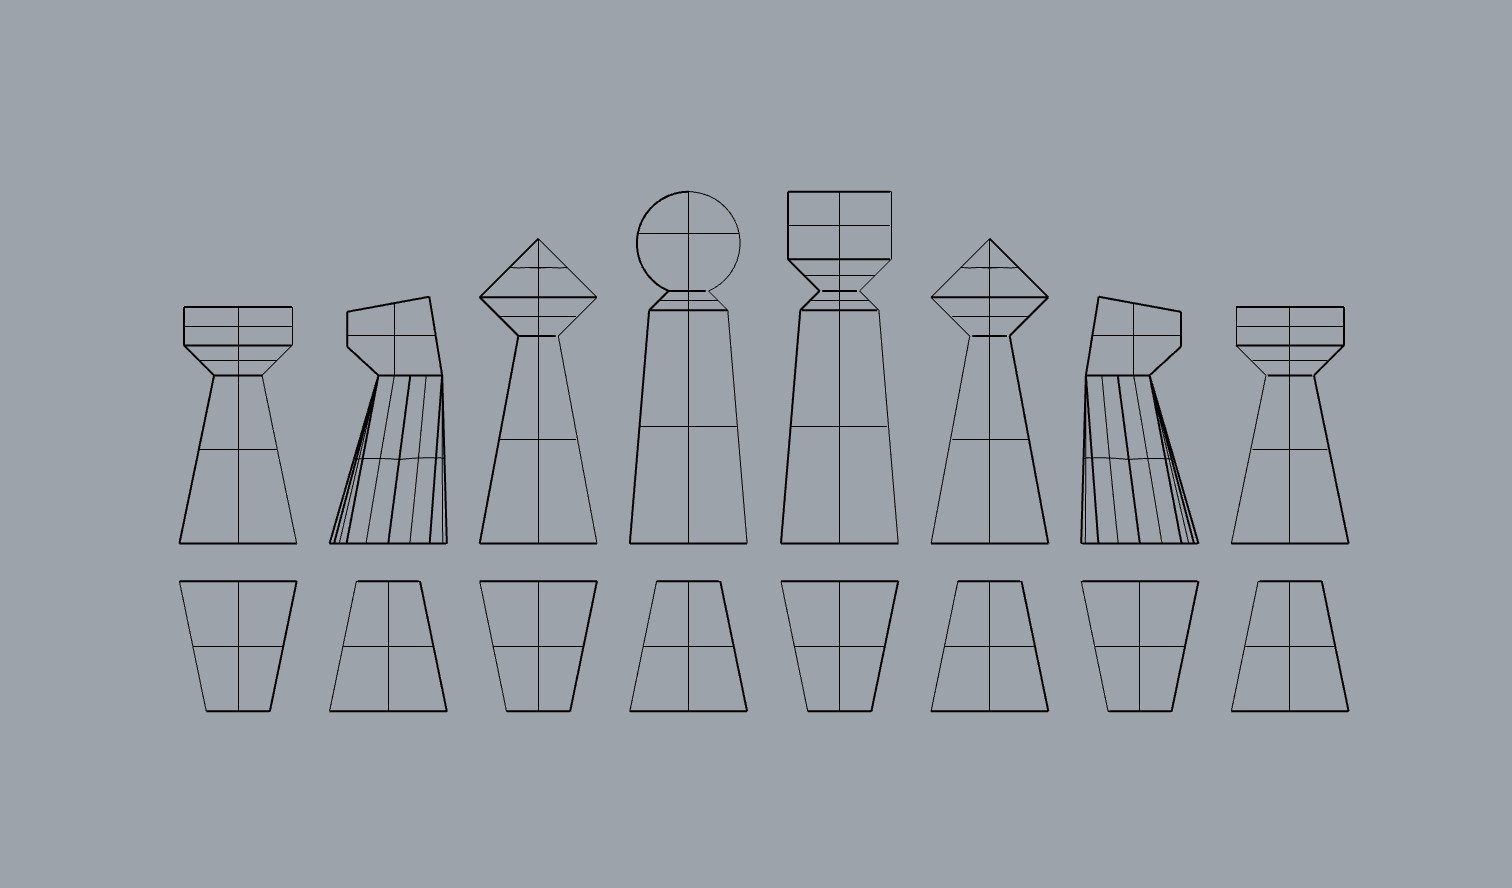
The design of the pieces was inspired by a minimalist interpretation of the traditional geometry. I limited all geometry to a series of spheres, cones and cylinders to create sculptural forms, while still maintaining recognisable piece shapes as much as possible. The issue I usually have with more modern looking chess sets is how far the pieces depart from traditional designs to a point where they become confusing and difficult to play with.
The chess set was 3d modelled using Rhinoceros, and dxf files were exported to Fusion360 for the toolpath and G-code creation.


240 minutes
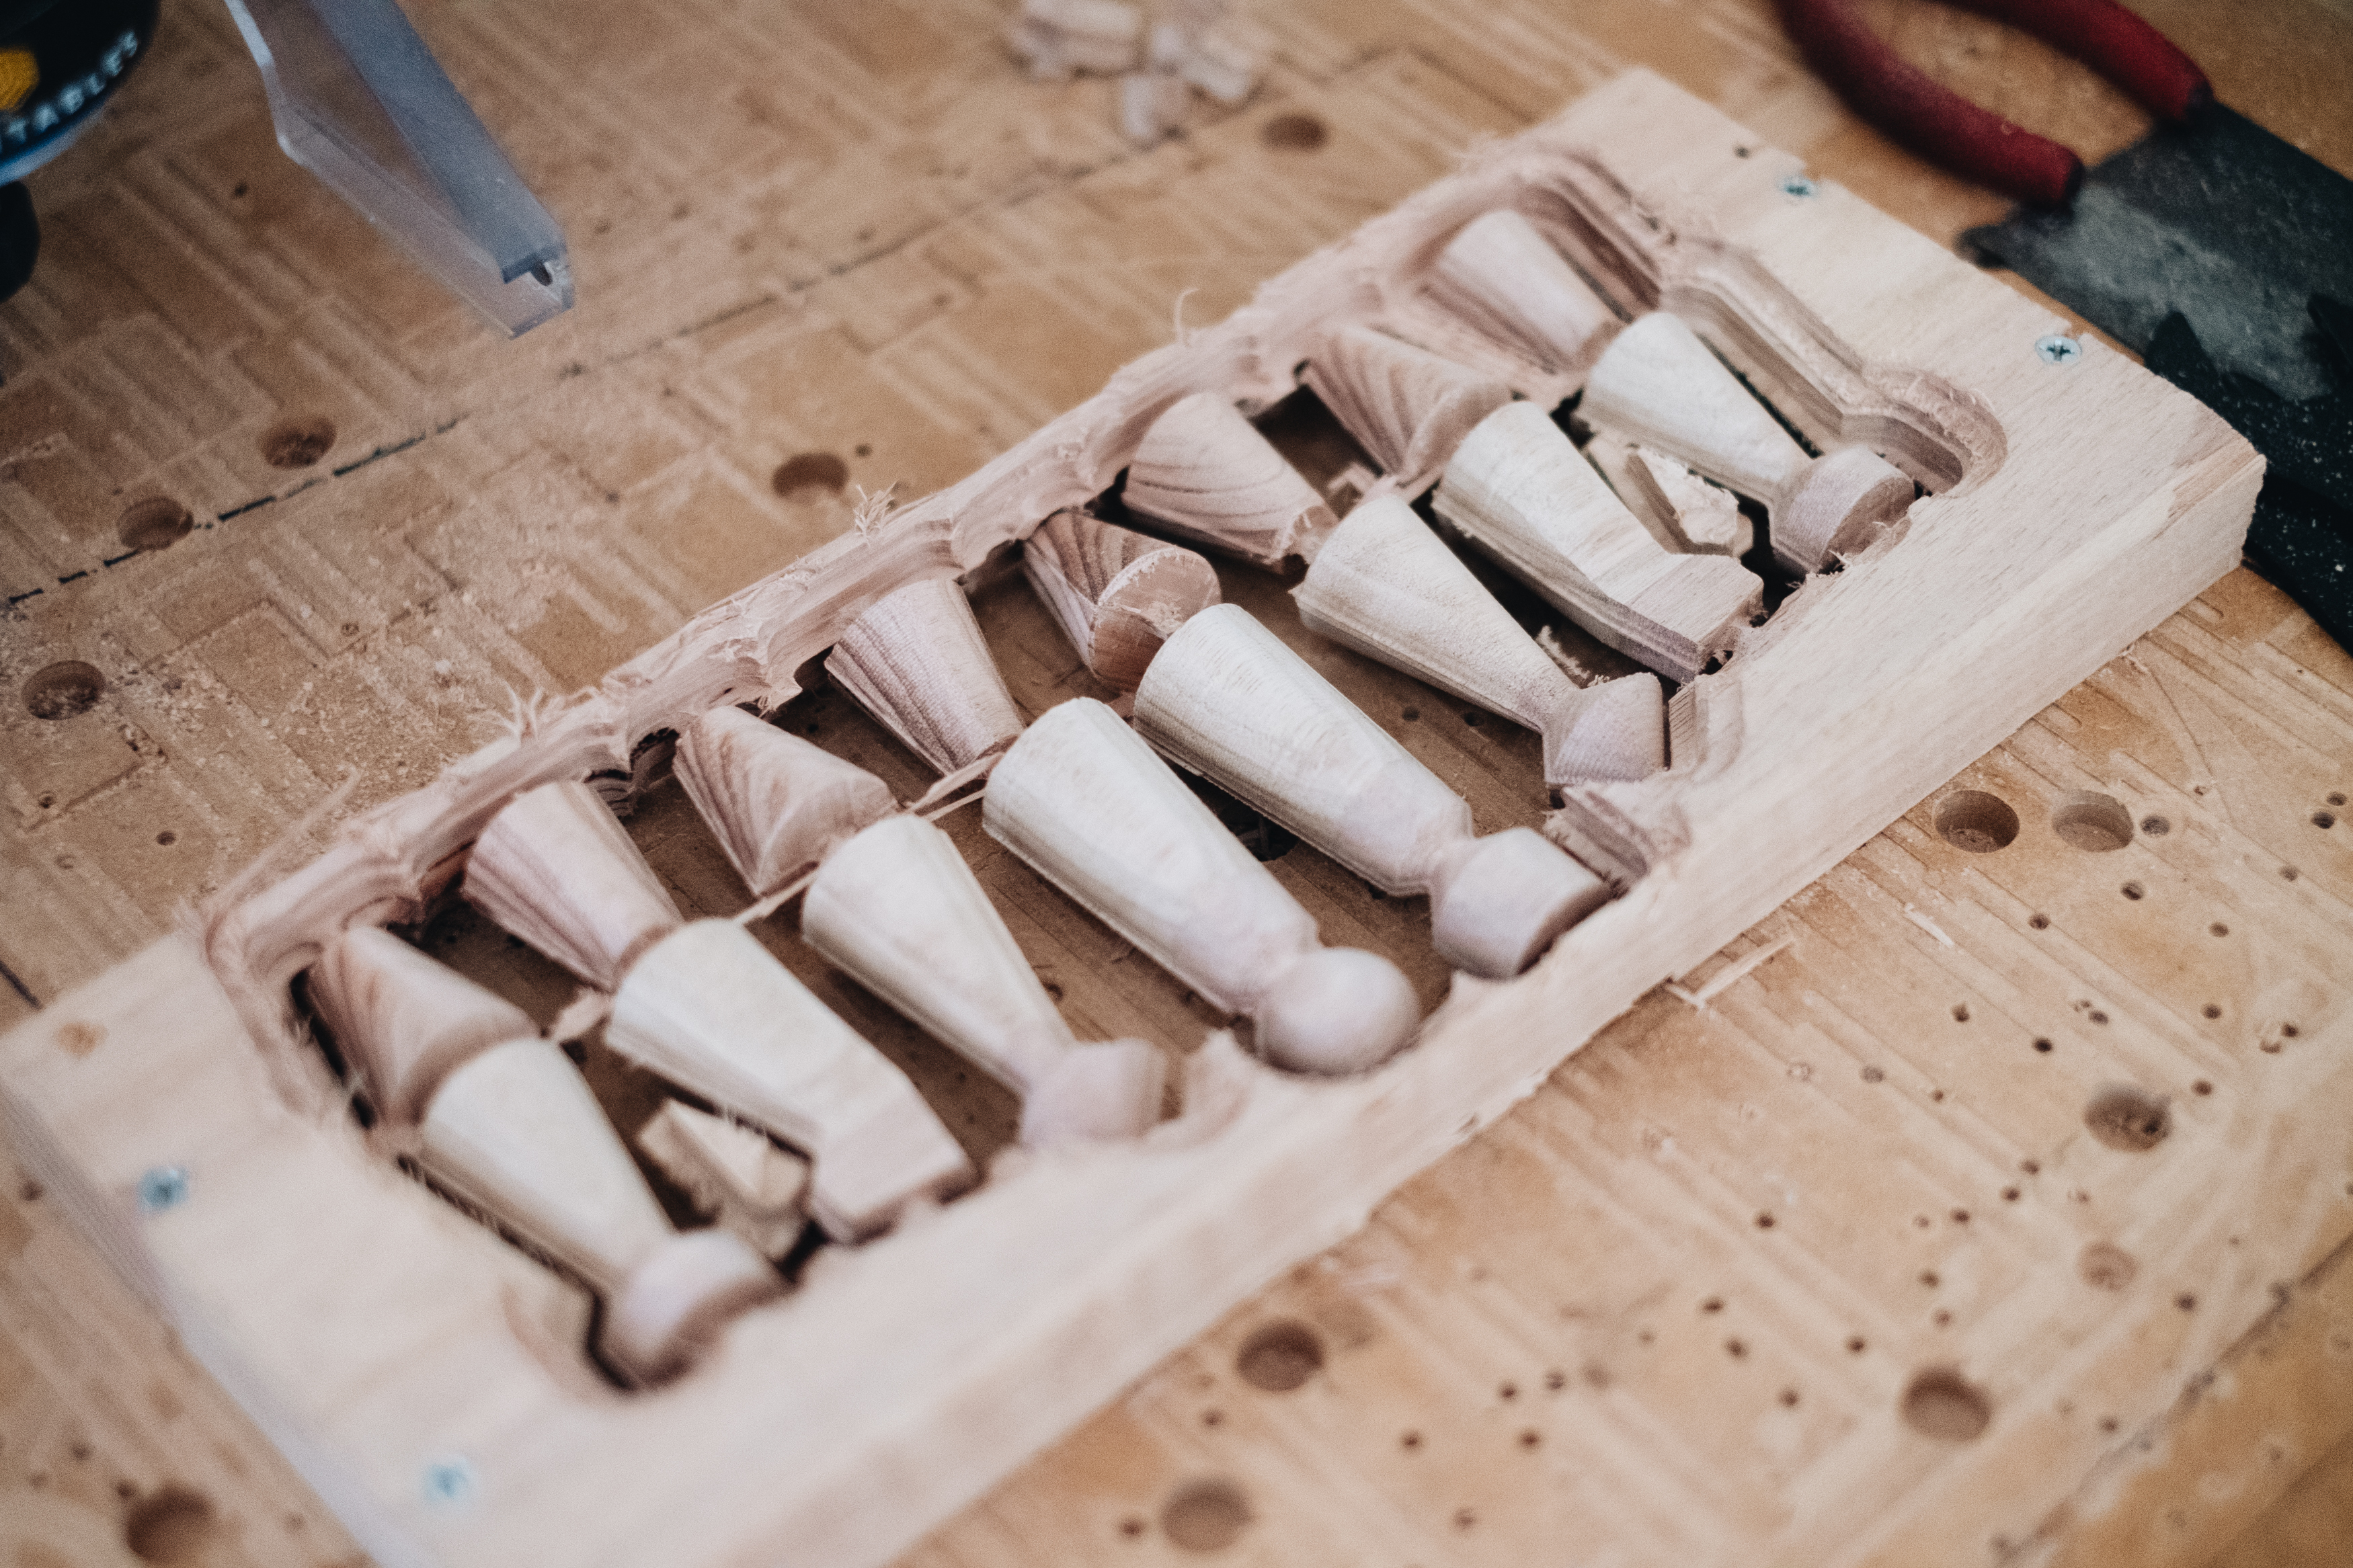
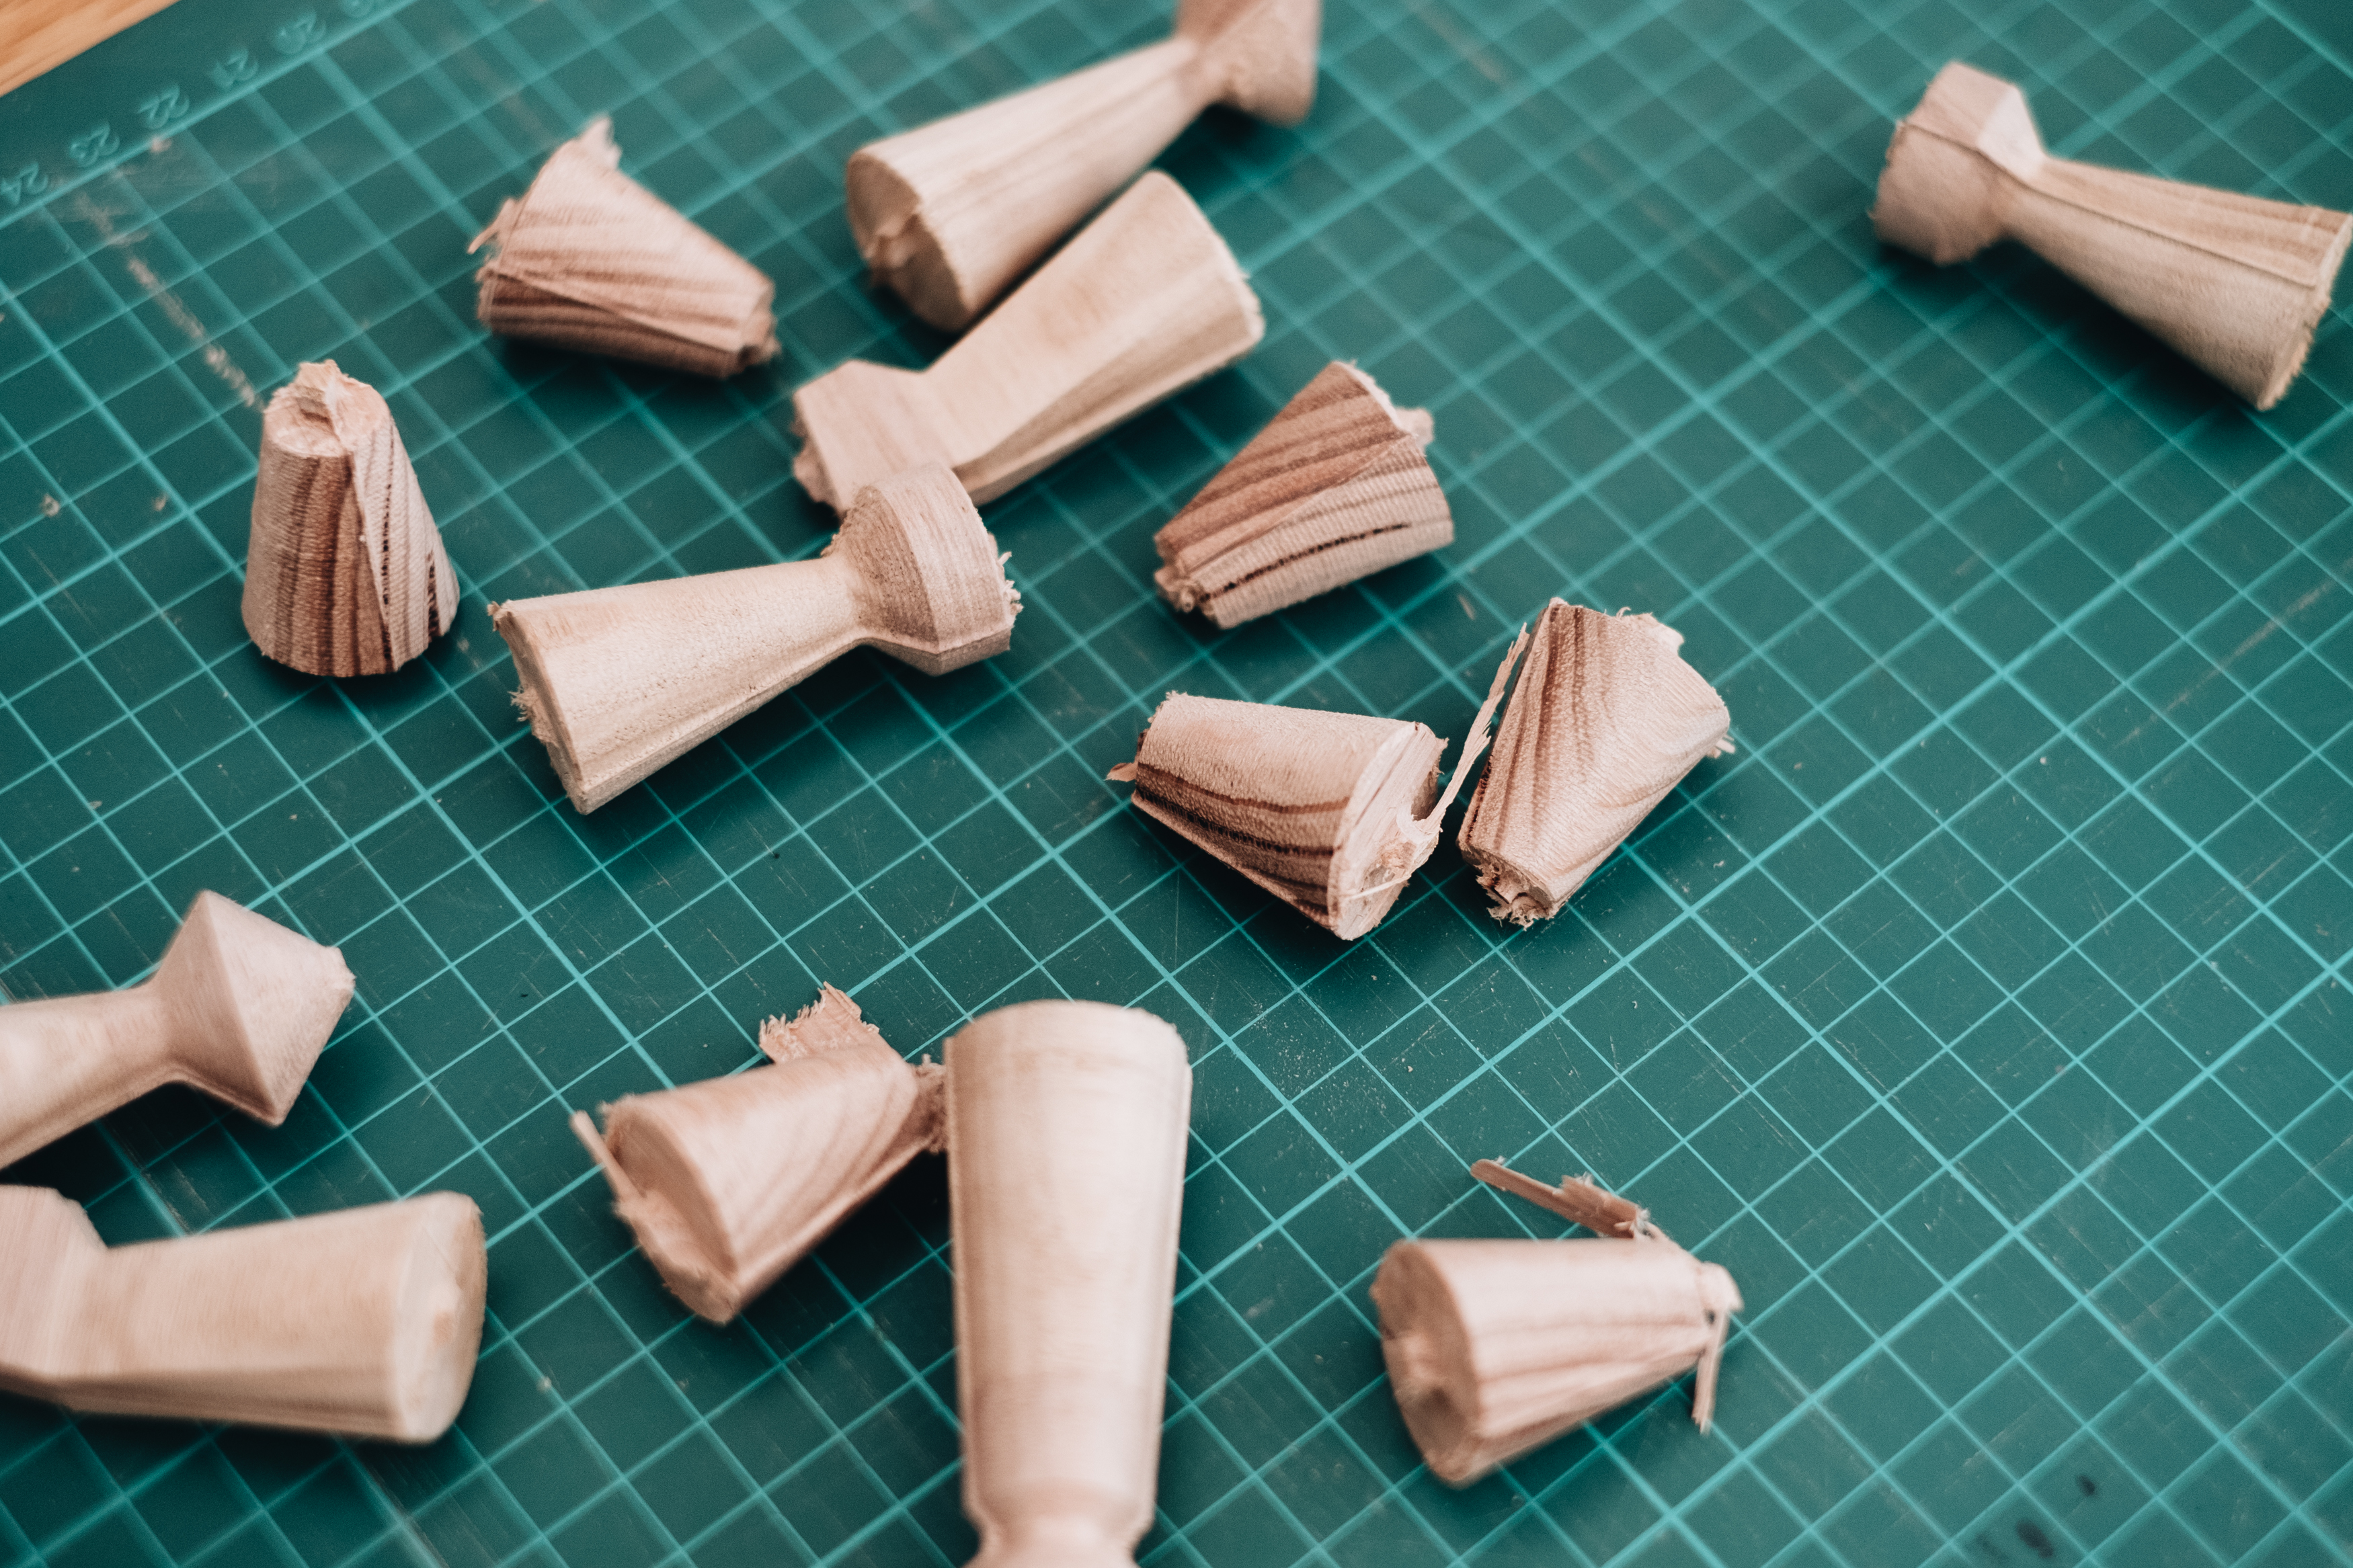
First step was to carve the blank set of pieces on the X-Carve to be moulded in silicone. I used a 320mm x 120mm offcut of blackbutt about 25mm thick. This was a two sided carve, so I used some reference dowels to be able to flip the timber after carving the first side and maintain the same X-Y zero. I only carved out one set of pieces to be moulded.
For the carve I used the following bits:F
12.7mm (1/2 inch) flat 2 flute bit (cut 1 roughing)
6mm flat 4 flute bit (cut 2 roughing and contouring, + reference dowel pins)
3.18mm (1/8 inch) 2 flute ball end mill (cut 3 finishing pass)
Each side took around 2 hours for the carve, including tool changes, stock fixing etc
Link to fusion file for the pieces: https://a360.co/2MMWyI5


60 minutes
This was a similar process to the chess pieces, using a 300×300×25mm pieces of timber to create a mould for silicone to be poured into to create the ‘white’ part of the chess board. Recesses in the board would be filled in to create the black squares.
Bits used:
12.7mm (1/2 inch) flat 2 flute bit (cut 1 roughing)
6.4mm (1/4 inch) flat 2 flute bit (cut 2 finishing)
6mm flat 4 flute bit (contour cut)
Fusion360 link to the chess board: https://a360.co/2AbARi3
If forgot to take pics of this step, but I have a photo of the final carve after being sanded and painted with spray primer.

60 minutes
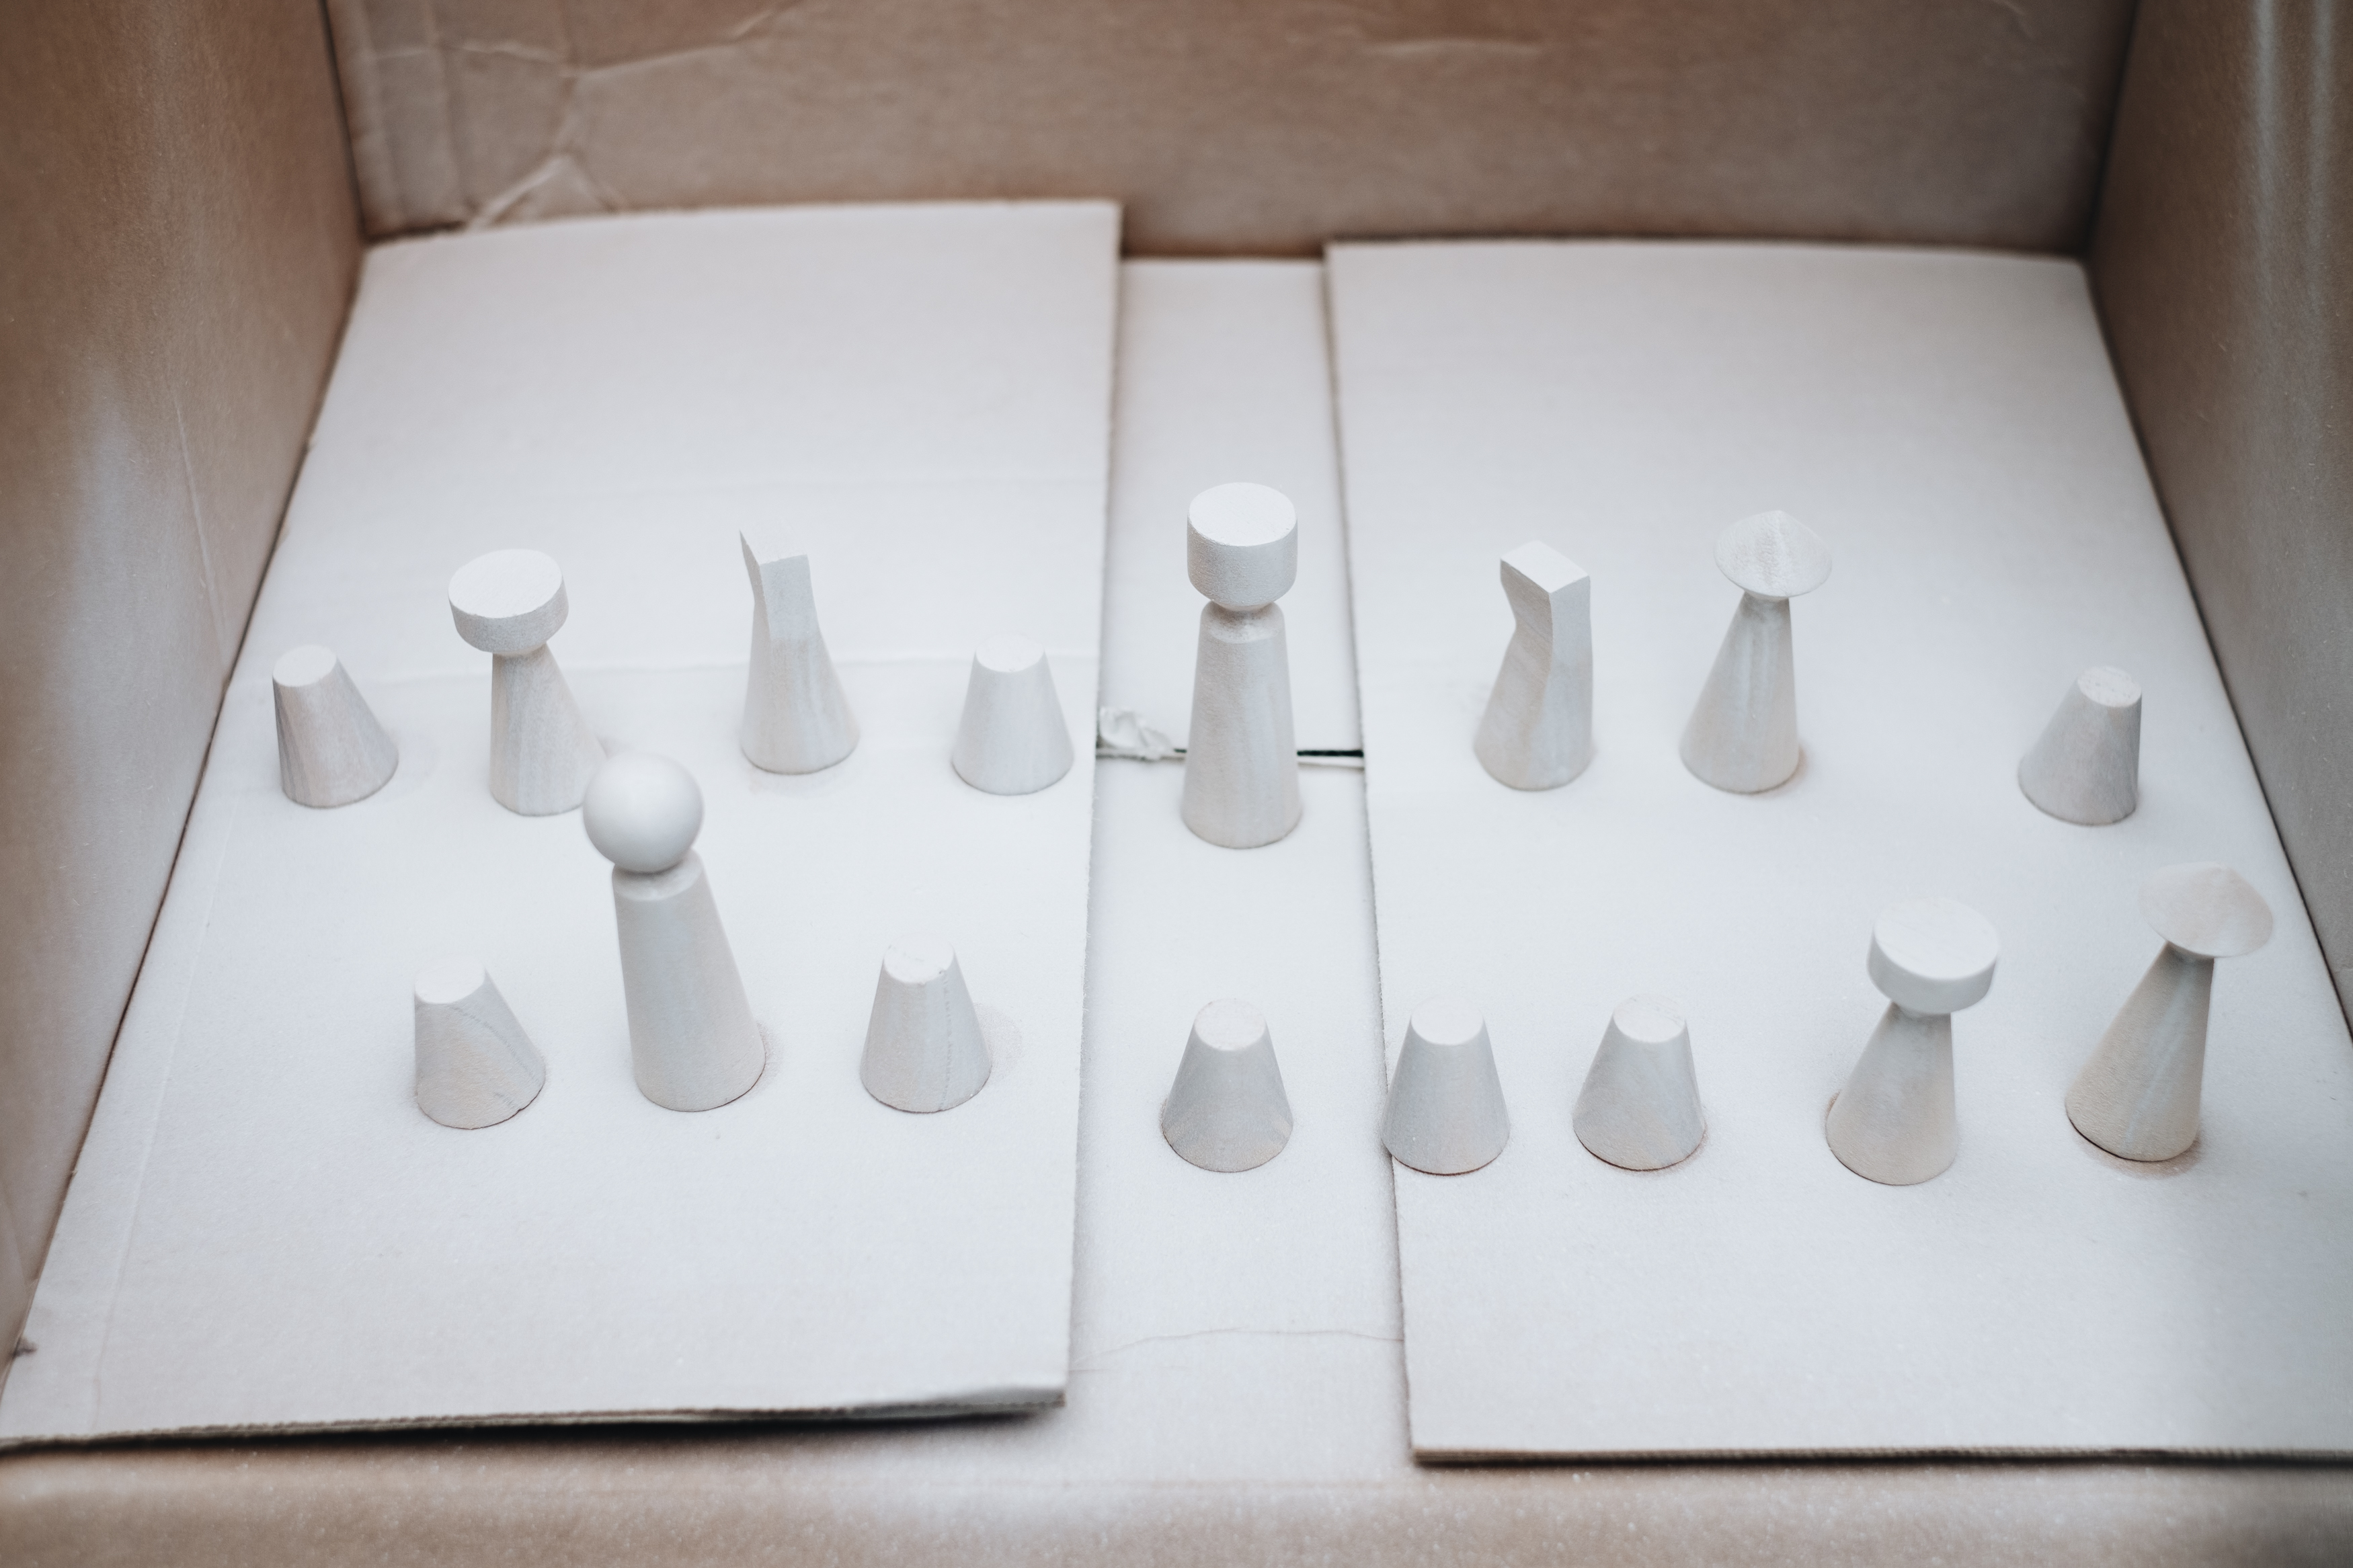
The next step was to sand and prime all the pieces and board to ensure the silicone moulding process did not pick up the machining marks and timber grain. I sanded the pieces to 240 grit sandpaper, and used 2-3 coats of white spray primer to hide the timber grain, waiting around 30 min between coats for the primer to dry. The silicone picks up fine details like timber grain so I find spray primer helps a lot in creating a more uniform surface for moulding. In a lot of ways it would probably be a lot easier to used a 3D printer to create these pieces…
After priming I did a final sand using 240 grit sandpaper to smooth and remove any areas of excess paint.


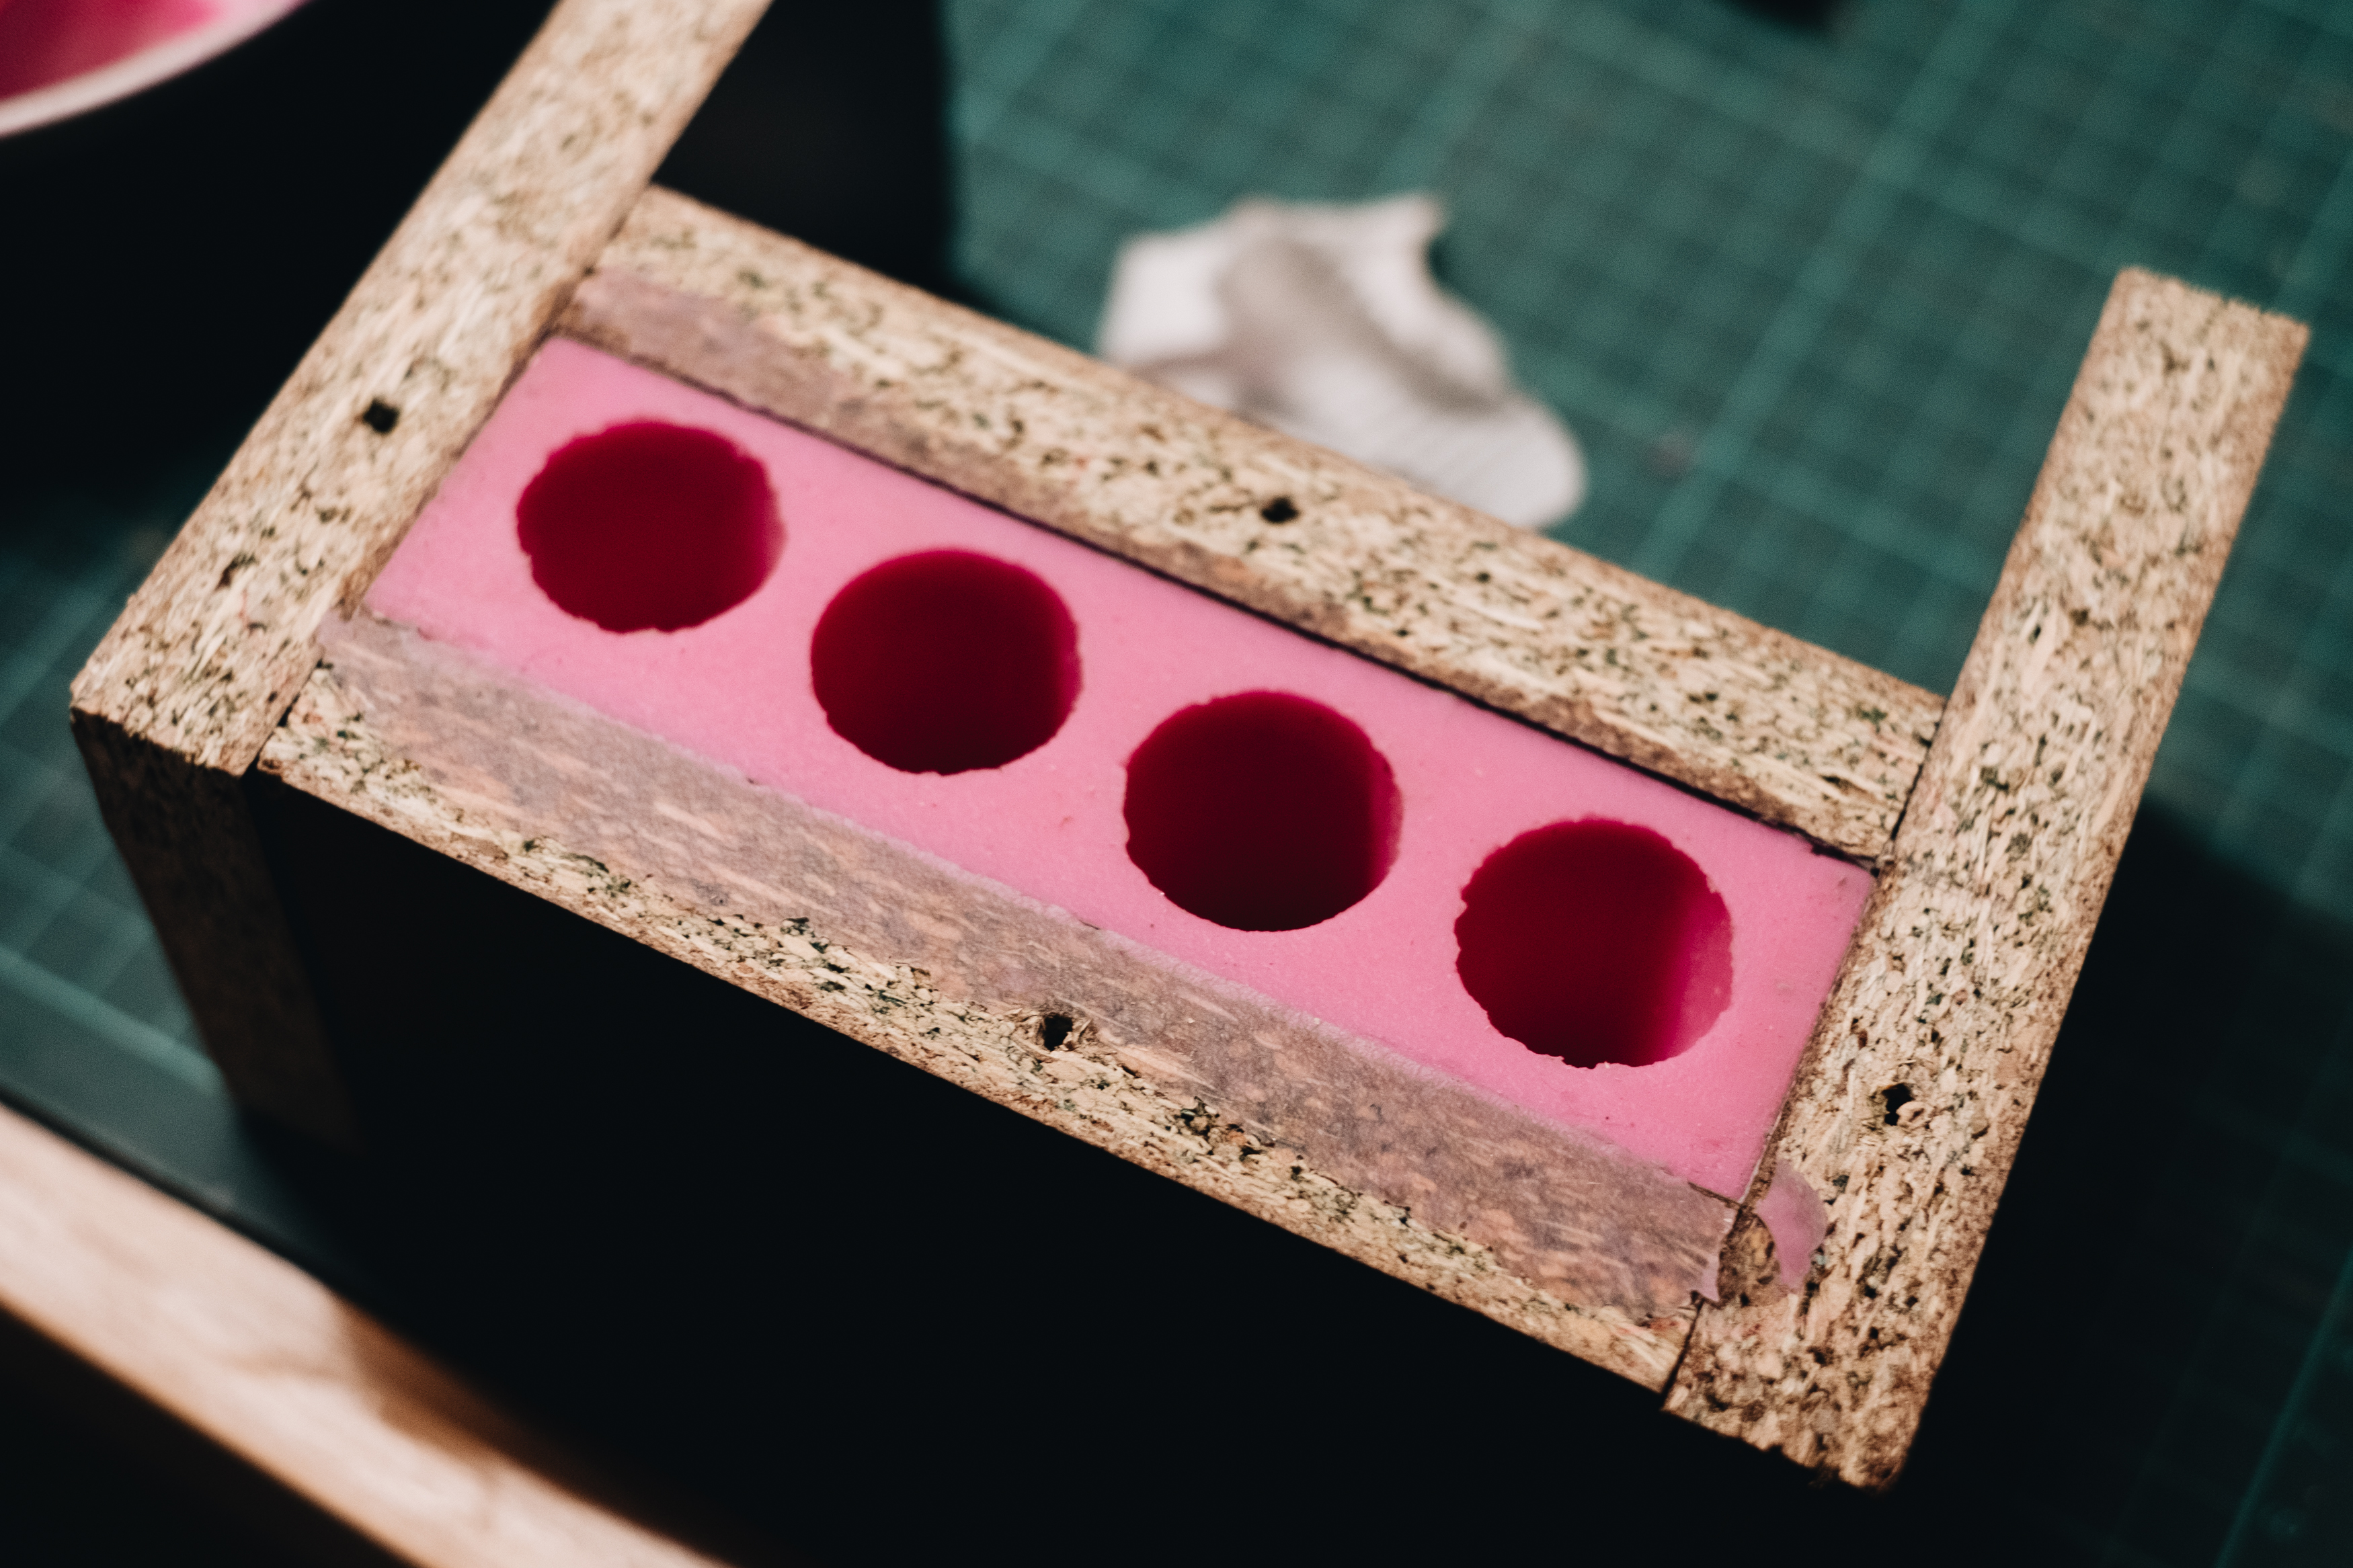
I used some spare melamine boards to create some small formwork boxes for the chess pieces. You can use any plastic box for the formwork here, but I wanted to conserve the expensive moulding silicone and match the dimensions of the pieces as close as possible with the formwork.
I glued each pieces to the bottom of the form boxes using double sided tape, leaving about a 5mm gap from the widest edge of the pieces to the edge of the form. I separated all the shorter pawns into one form, the knights and rooks into another, and the taller bishops, king and queen in the final form.
Any flexible moulding silicone will do the job for this – I used Pinkisil for its quick demoulding time (20 min) and great detail. After the silicone had all hardened and cured, I unscrewed all the form boxes to remove the moulds and used a craft knife to cut out the timber pieces from the silicone (except for the pawns which just popped right out). I tried to cut as straight as possible along a vertical line for each timber piece to be removed.
For the chess board I poured the silicone straight into the primed timber. Took a bit of fiddling to pull the silicone mould out after it had cured.


30 minutes
For the concrete mixes I used a combination of coloured bathroom grouts (to achieve the white and black piece colours) and some quick set concrete which provide some aggregate to the mixes (which you can see exposed after being polished back on the chess board). I used approximately a 5:1 ratio of grout to quick-set concrete mix.
I added water to achieve a flowable toothpaste consistency, which allowed the concrete to be poured and vibrated into the moulds. Note I didn’t have any mould release spray to apply to the silicone but this would definitely help. I added a single ~30mm long bullet head nail in the concrete moulds to reinforce all the pieces except pawns. There was some guesswork here in pushing the nails far enough into the concrete without hitting the bottom of the mould. My first unreinforced batch of pieces all lost their heads so they’re definitely required. Especially for when pieces go flying during those aggressive board-flip moments.
For the board I used a piece of 250mm square wire mesh as the reinforcement.
The moulds were all vibrated for about 2 minutes each to remove as many bubbles as possible before allowing to cure for 3 days with a pieces of cling wrap over the top of the exposed concrete. The cling wrap helps keep in the moisture and prevent any cracking, and I misted the concrete a few times each day during curing.
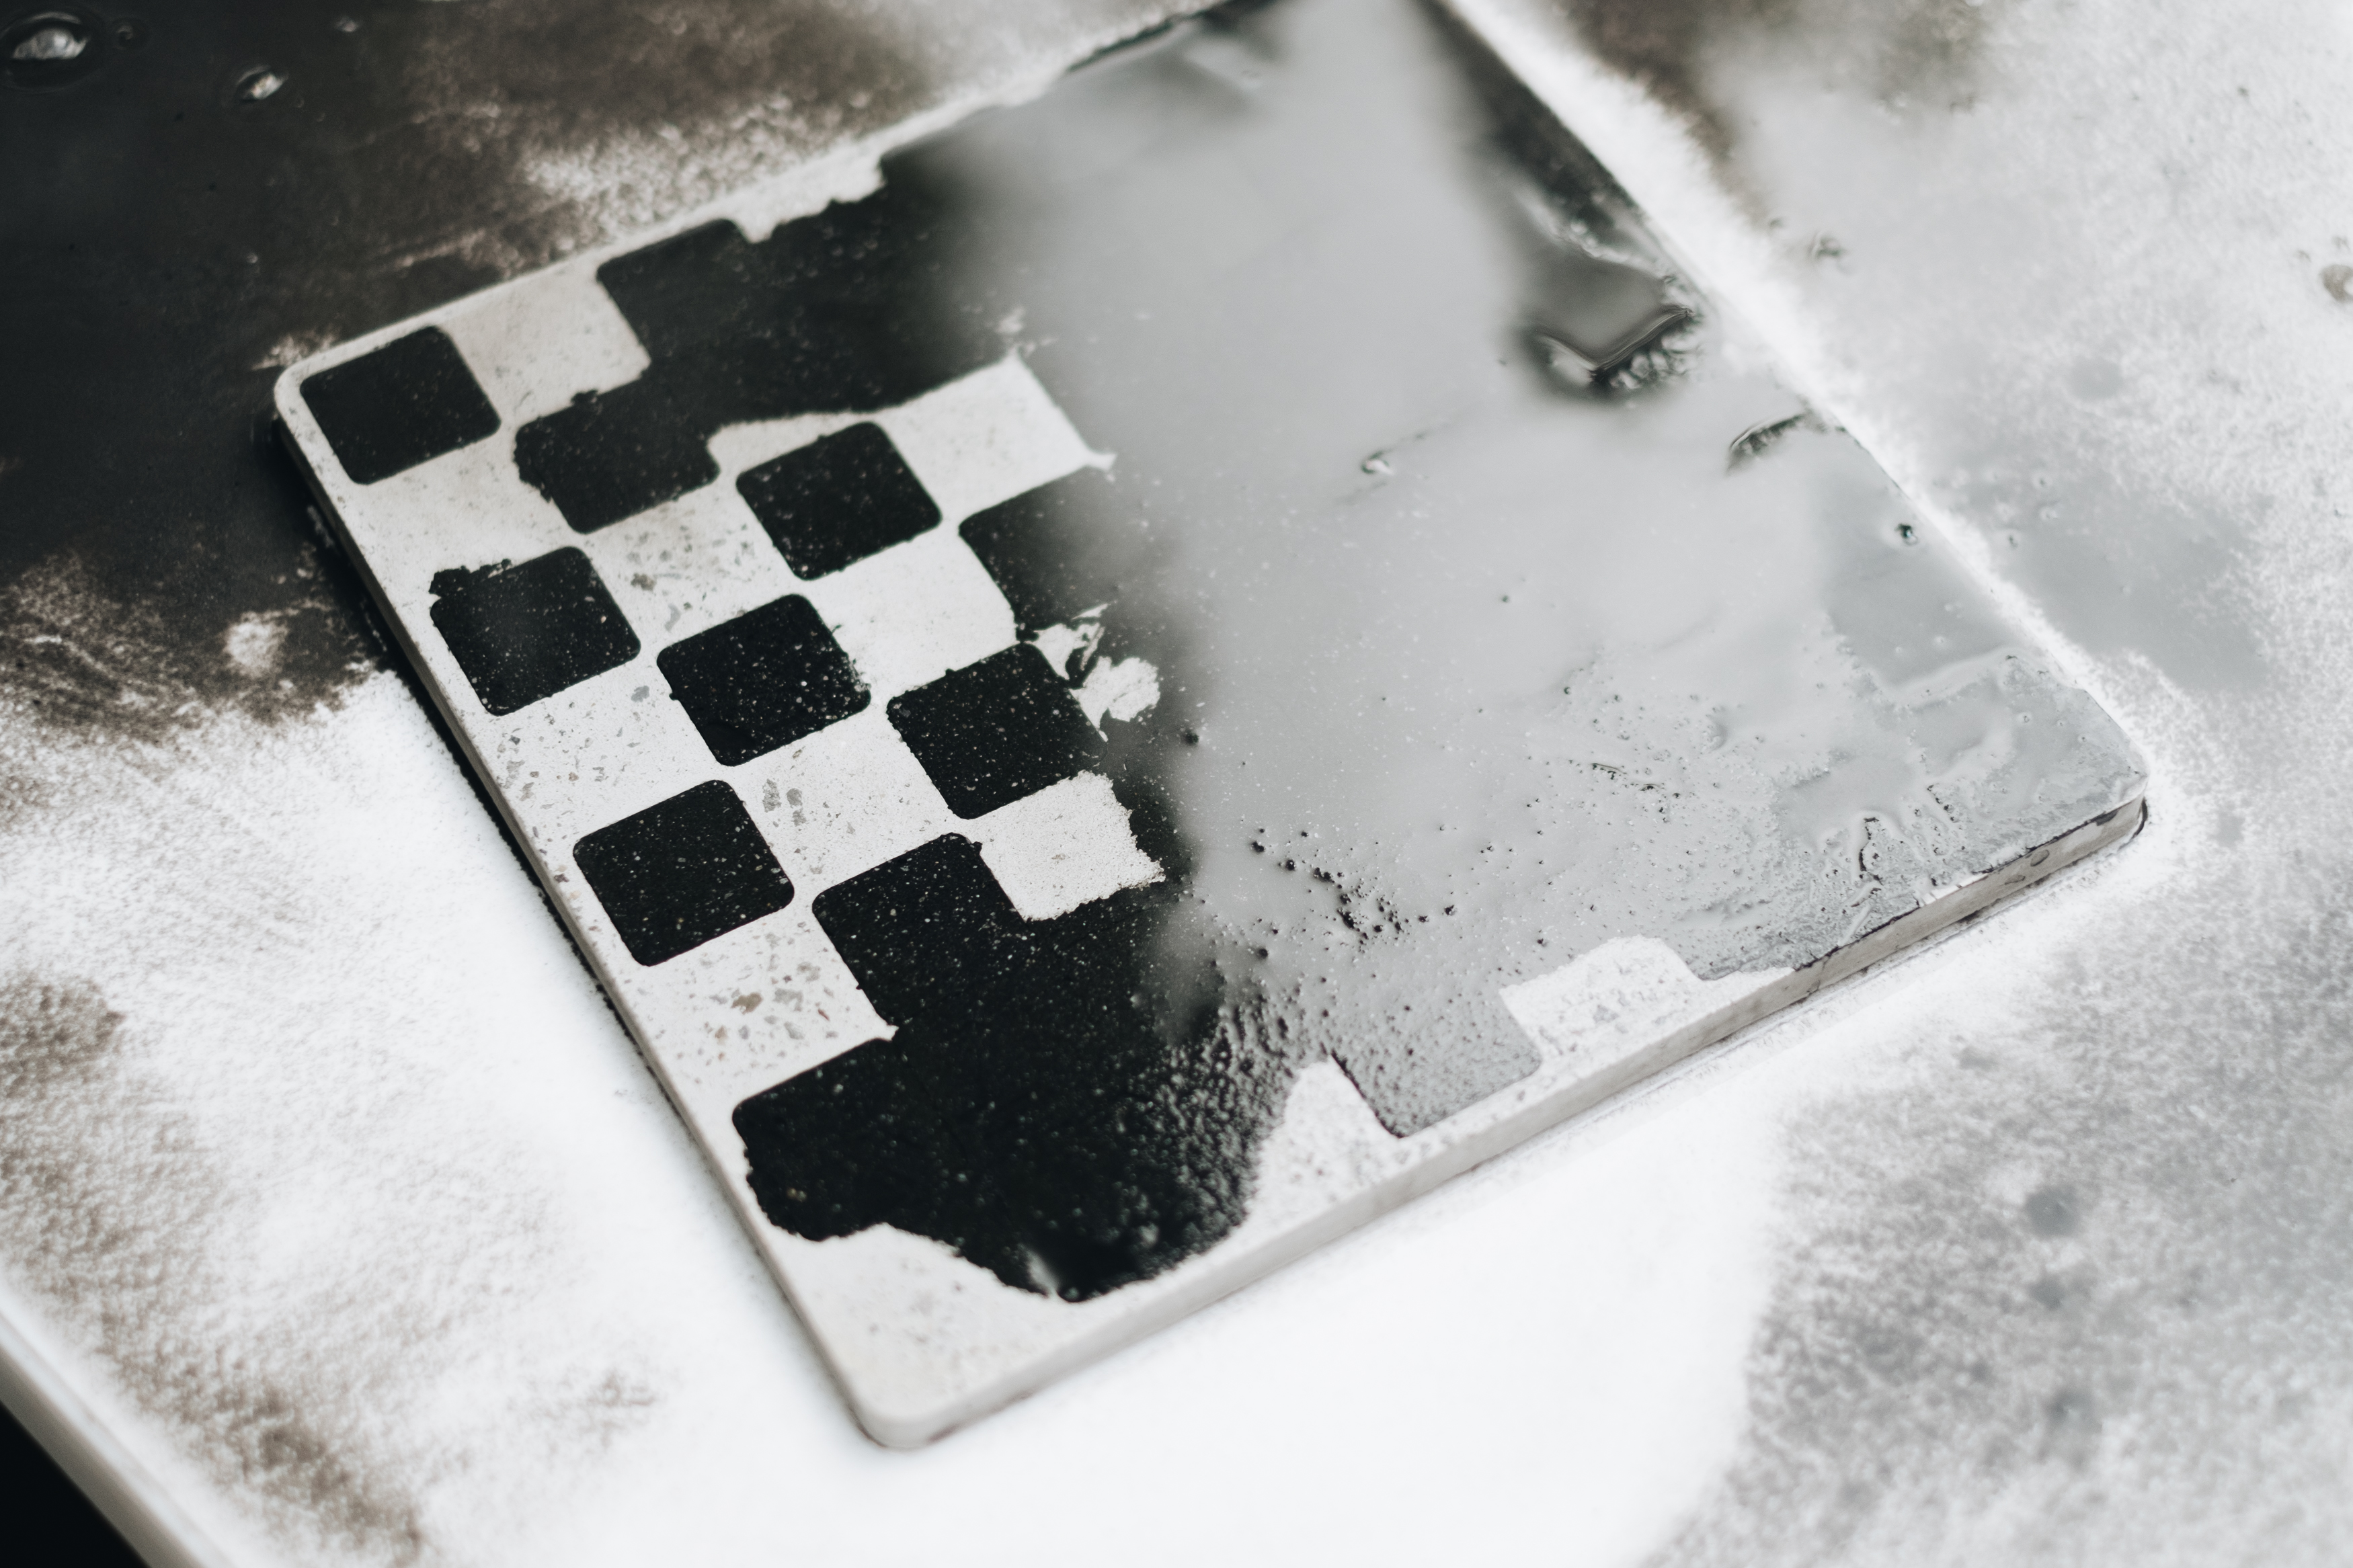
I poured the white concrete for the pieces and board first, and black pieces and squares second. I overfilled the recesses in the concrete board with black mix to be ground back later – no need to be too neat during this step.


60 minutes
There were some imperfections in each of the pieces after demoulding, which is absolutely part of the character of using concrete, but I sanded back some of the more major inconsistences with some 240 grit wet-dry sandpaper. Mainly the seam lines which were created where the silicone had been cut to remove the pieces.
For the board I used a set of diamond polishing pads on an orbital sander, gradually working my way from 50 grit to 6000 grit, ensuring the surface was wet at all times. These polishing pads can be picked up relatively cheaply from eBay – https://www.ebay.com.au/itm/9-4-Diamond-Polishing-Grinding-Pads-Disc-Wet-Dry-For-Granite-Concrete-Marble/283805874363?hash=item421425f8bb:g:dwcAAOSwv~peYdvl&frcectupt=true
The aggregate was exposed quite nicely in some areas which really gave the board that ‘concrete’ look. The grinding took quite a while using an orbital sander, so I would recommend using a proper speed-adjustable polisher for this step.
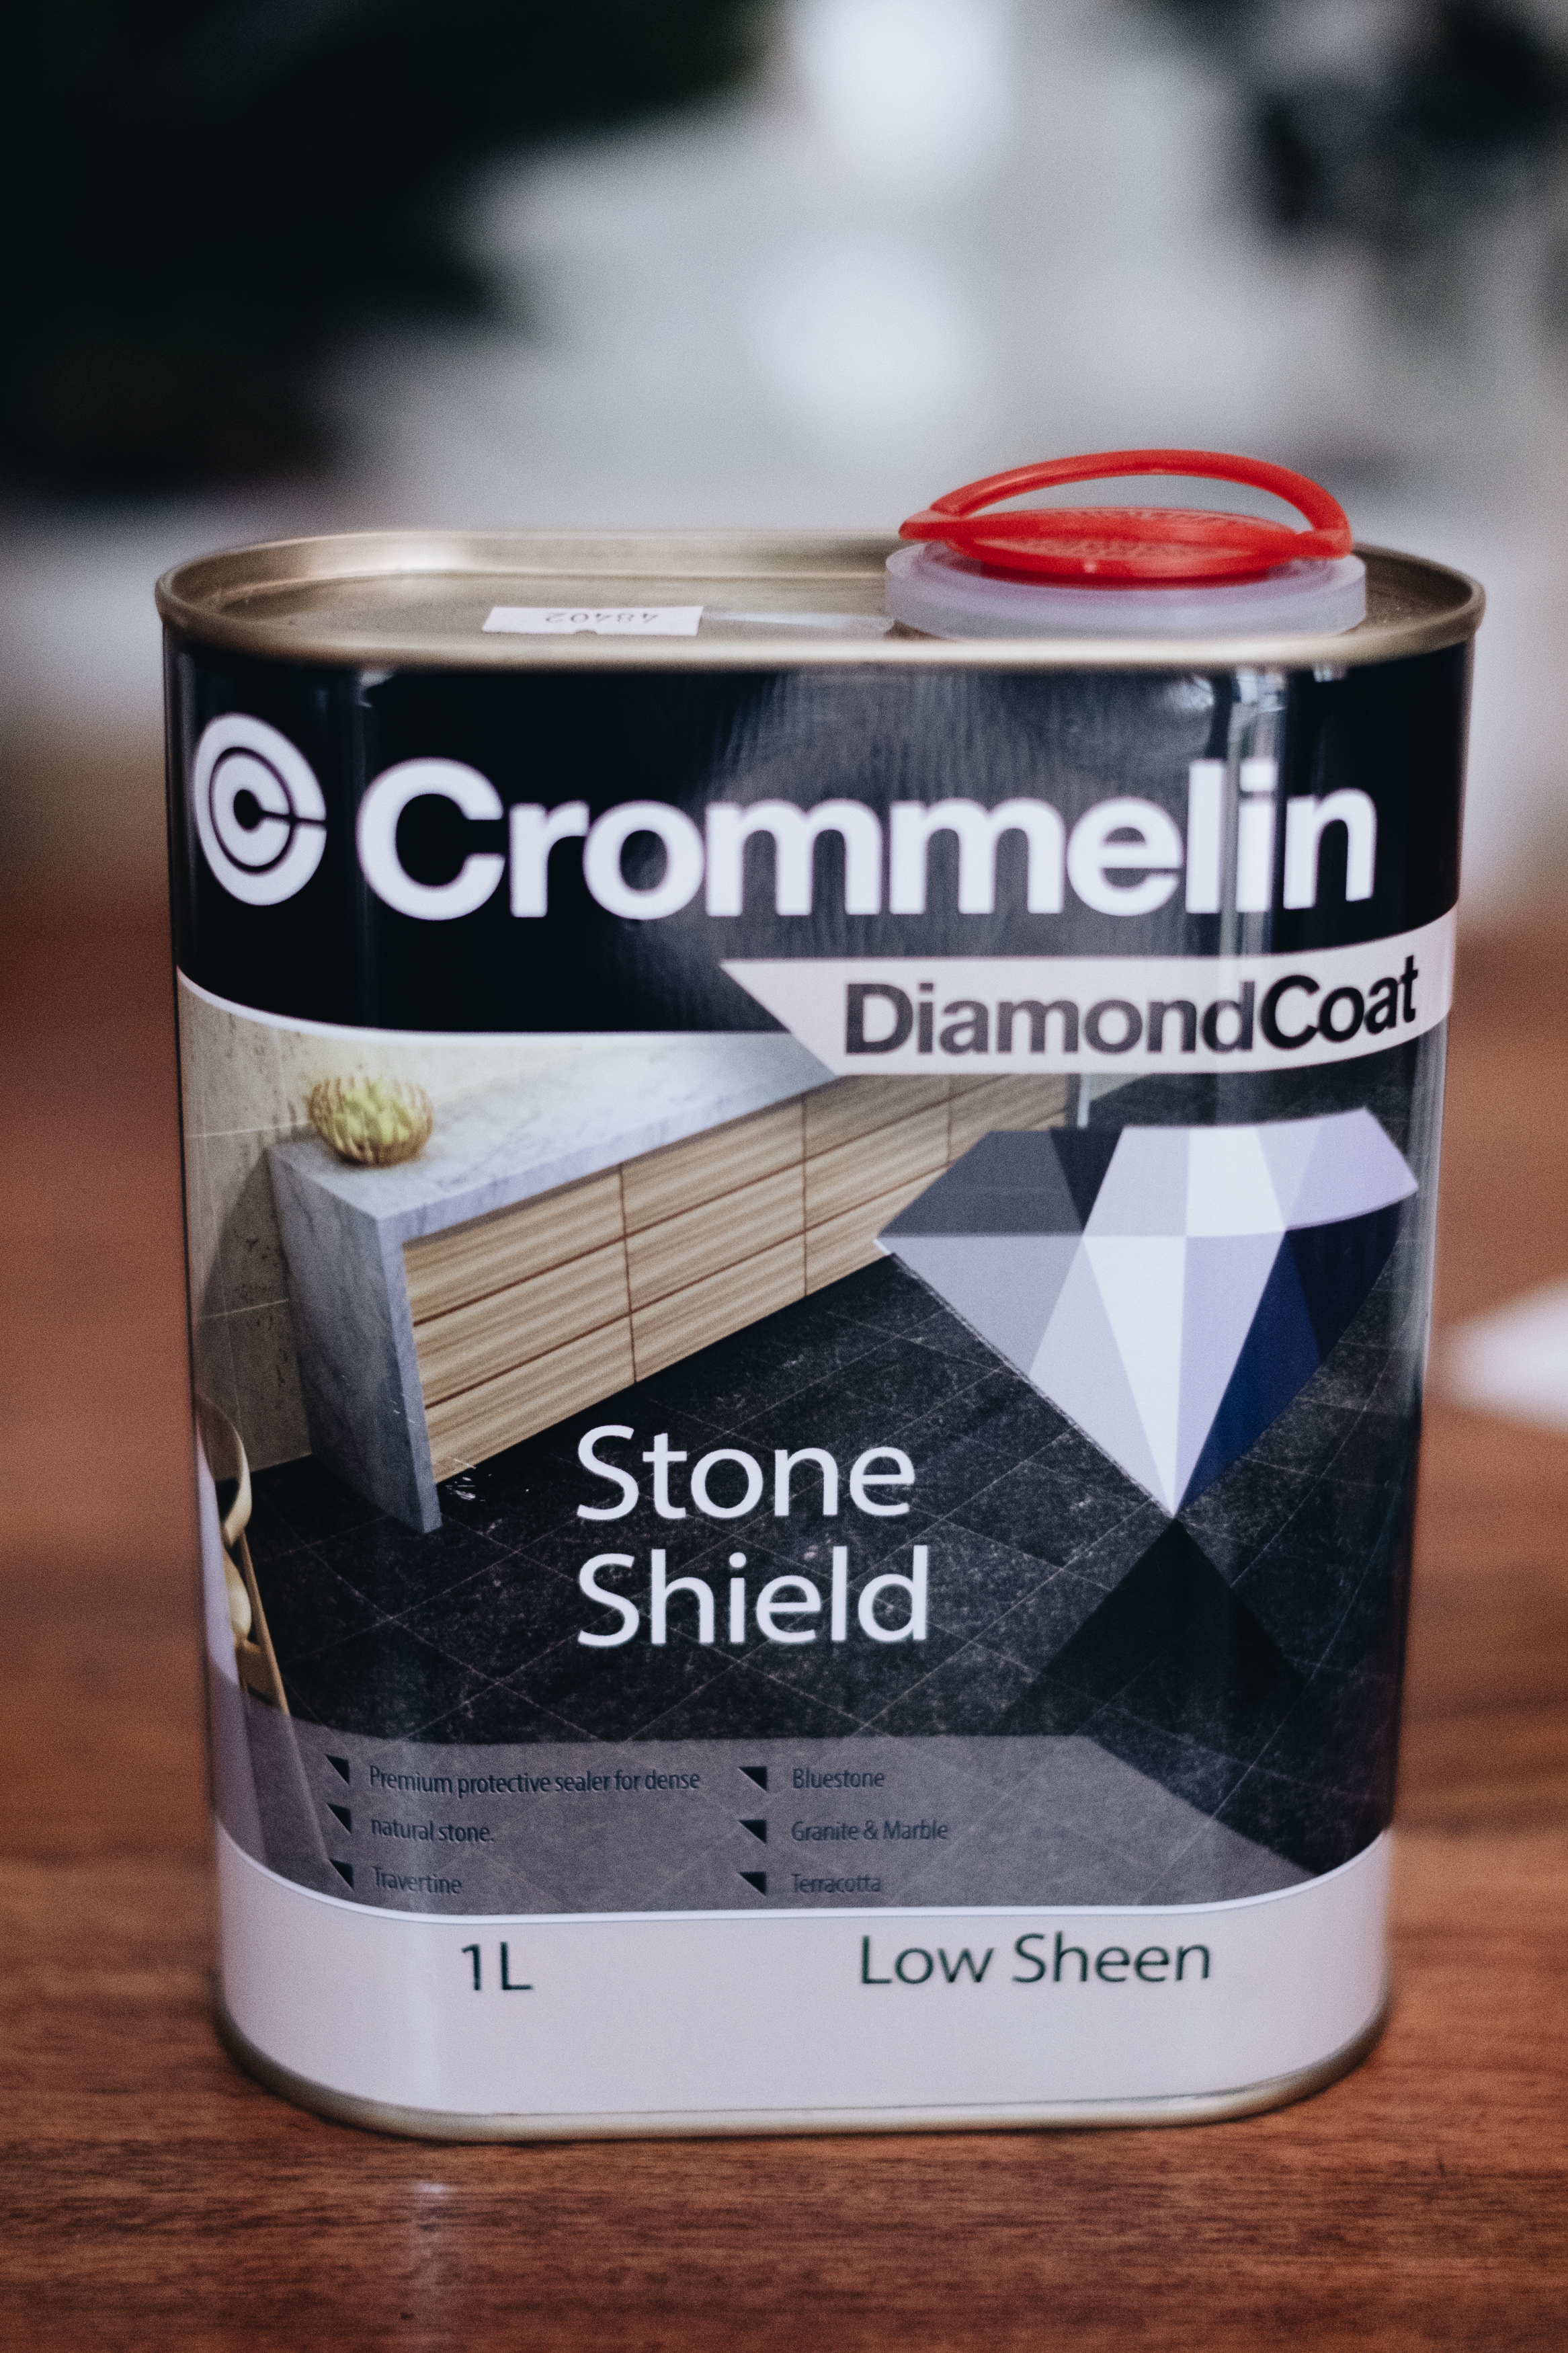
Finally, the pieces were all sealed using a penetrating concrete sealer. I used a low-sheen finish to keep the natural look of the concrete. I would recommend only using penetrating sealants since they can be waxed afterwards to achieve an even higher sheen and finish.


And that’s all there is to it (can you sense the sarcasm?)
Look, it’s definitely a labour of love, and not just a weekend project. But once the moulds are done it isn’t too hard to make quite a few of these without much more effort. I definitely learnt a lot about concrete in the process, experimenting with various mixes and finishes, and the final product was really satisfying. I really love the weight and feel of the concrete, and the natural imperfections which give each board such a unique character.


Bug Bolito