
Jon Glazer
Grove City, Ohio
After building my X-Carve, one of the first things I wanted to do was create a decent halftone image. After many hours of experimenting with bits, software and material, I think I finally found a combination that works great!
1 minute
I experimented with a number of different materials including
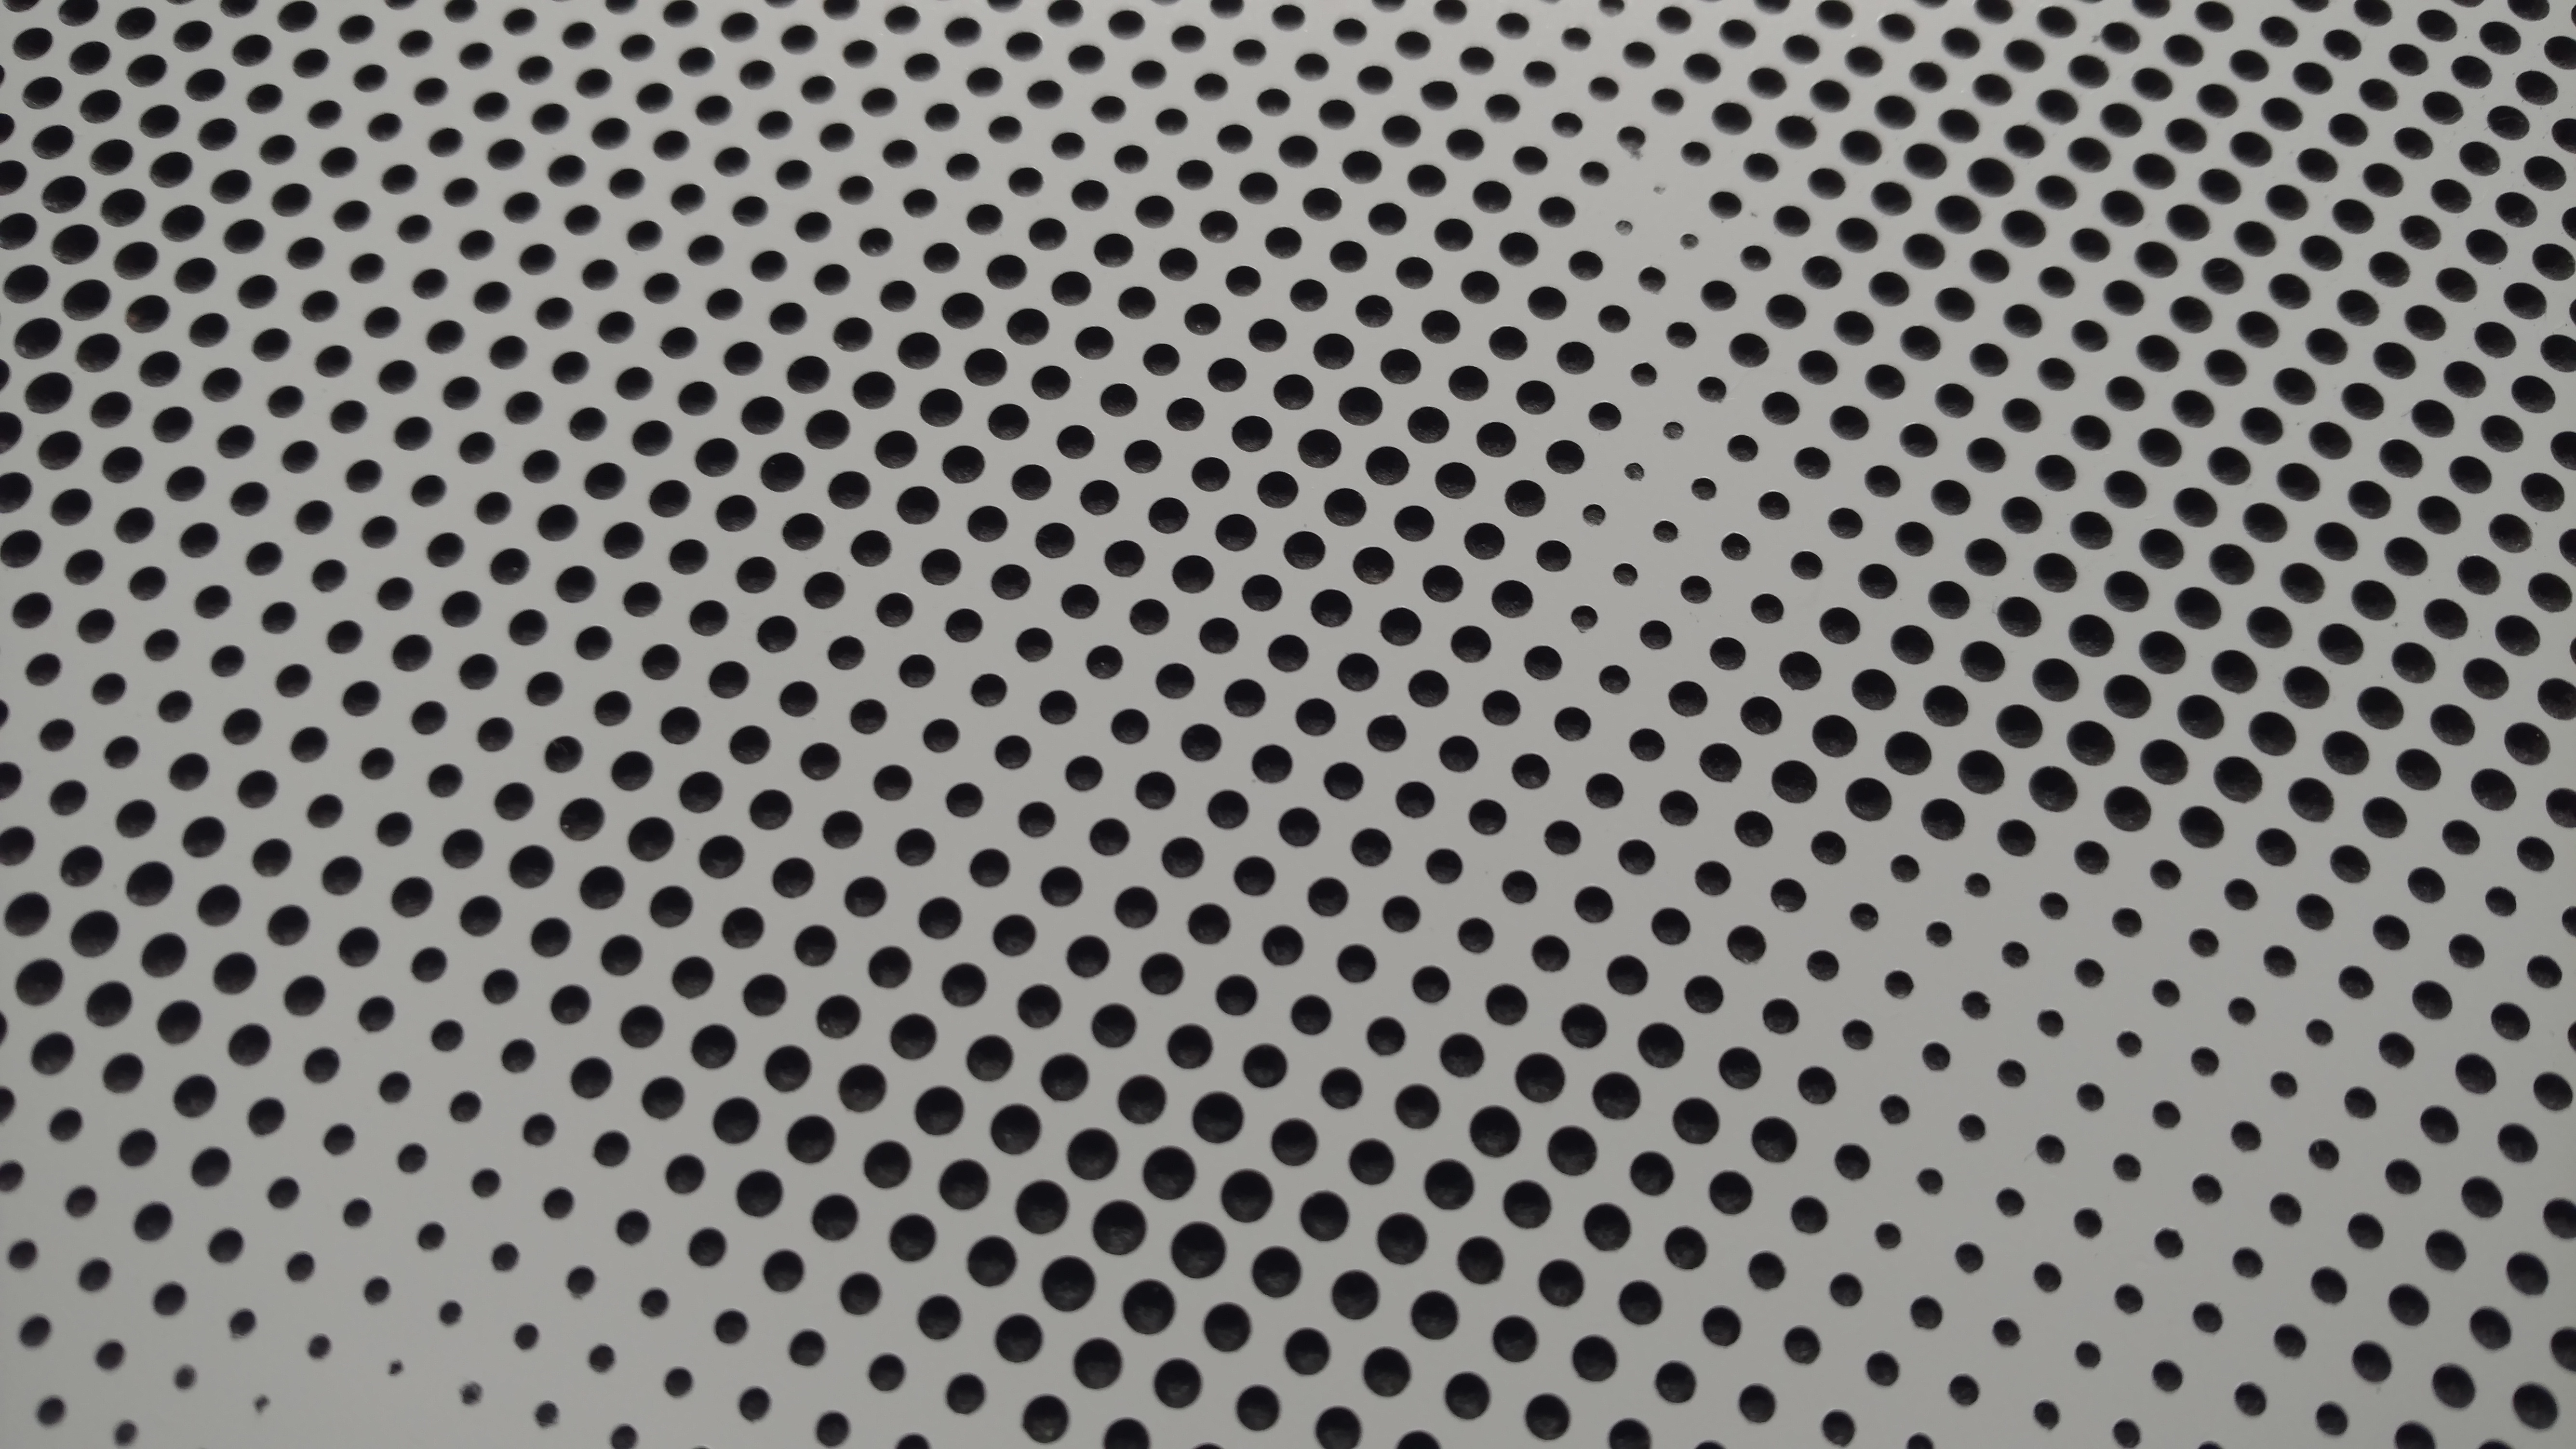
The best results were achieved with the whiteboard. Its hard surface allows the bit to carve a smooth, sharp circle with no “tearing”.
The photo shows the 2′×4′ “whiteboard” which, I think is simply a cut piece of melamine. The other photos shows a 4′×8′ sheet of melamine. Cost-wise, you get 4 whiteboards for the cost of 3 if you have them cut the melamine for you. Unfortunately they only had a single damaged 4×8 so I went with the 2×4.


5 minutes
Unfortunately Easel cannot create halftones. Well, at least not directly. So I turned to other software designed specifically for this purpose:
I settled on Halftoner v1.5. It’s easy to use and very clean. The interface could be improved a bit (like the ability to zoom in on your preview). It generates simple G-Code that every simulator I tried was able to read (but not render … rending halftone images seems beyond anything I have found so far).
More on Halftoner v1.5 later in “Creating the Halftone G-Code”
5 minutes
As stated previously, Easel won’t help you here. It would be nice if it has a decent interface for simply sending G-Code to your CNC but fact is (at the time of this writing) it doesn’t. So I turned to alternatives. There are many G-Code senders out there. Some are free, some can be purchased for a nominal fee and they cover just about every O/S you can think of – Windows, Linux, Android, MAC, etc…
For the my purposes (and this article) I chose to use Universal GCode Sender. This is a free, Java based application that will run, pretty much, on anything. I am not saying it is the best, but from my limited use (about 12 different runs) it’s pretty solid. I’d like to see some improvements, like a visualizer that can actually show you your halftone result. However, it does what it needs to do, send G-Code to your GRBL CNC without a hitch. More on this later in “Sending the G-Code”
5 minutes
Assuming you choose to use the whiteboard or something with a white-painted surface, depending on the core material you may wish to spray paint the final holes black for the best contrast. To prep for this, use some inexpensive “blue” masking tape to cover the entire board prior to drilling. You will be drilling through the tape to make the holes.

Now we get to the meat of the project. Creating the G-Code. Again, I am going to use Halftoner v1.5 for this example.
I cannot tell you what a headache it was to work in inches when everything (including the X-Carve itself) is laid out in millimeters. That aside, there seems to be an error in Halftoner that will not convert from inches to millimeters when writing the G-Code (or maybe the sender needs to know that the data is inches). Save yourself some frustration and heed this advice!
This tab allows you to define the specifications of the halftone itself. Most of it is self explanatory. My experience thus far is to make a halftone that is at least 400mm in one direction. Anything smaller and you have to make too small of holes or too few to get it to fit and the result doesn’t have enough detail. I think spacing needs to be at least or slightly smaller than the max size and the measurement is from origin to origin of each hole. This means that if do not change the spacing but change the max size, the number of holes will not change, they will just get grouped closer together as you increase the size. You can experiment with the other setting and see what will happen in the preview. The screen shot shows the settings I used for this example.
Since I am using a Dewalt 611 router that is not controllable in speed by the software, the only settings that mean anything are Safe Z, Feed and Tool Angle.
The author of this software, Jason Dorie, actually responded a few times to emails when I was trying to find all the right settings. For this reason alone, I highly recommend the software and to donate to his cause (PayPal link in his web page). Thanks Jason!


360 minutes
Ok we’re all set to start cutting!
The most difficult part of this software is getting it to communicate with your CNC. Each USB port on your computer is “assigned” a COM number. There is no telling which is the correct one. I expermented until I found that, in my case, COM4 corresponds to the USB port I connected to the machine. Set the baud to 115200 and click OPEN. You should hear your CNC stiffen up a bit as it receives a ready signal. To further test if the connection is good, click on the Machine Control tab and try raising the router (Z+) or any of the other controls. It will be apparent when you have hit on the right combination.
Using the buttons (X,Y,Z) move your drill bit to the lower left corner of your material. This is the home position. Lower the bit until it is firmly touching the tape. This is important. Usually you only want to barely touch your material but remember that it has to cut through the tape before cutting the material. I generally use a piece of paper and lower the bit until the paper is caught, then lower it another .2 mm or so. Once you do this and it’s set, tap the RESET ZERO button to lock it in.
Go to the File Mode tab and select your G-Code file created above. When everything is set correctly, hit SEND. The bit should raise, the router turned on (if you have that controller) and it will move to the first hole and begin drilling. Then sit back and watch it do its work … for 3-6 hours! Its mesmerizing, believe me! After staring at it for 5 minutes, shake yourself out of the trance and go live your life!
If, for some reason, its cutting wrong or you have a problem, click CANCEL (pause never did anything for me). Then, back on the Machine Control tab, click SOFT RESET to turn off the spindle and fix whatever needs fixing.
Here is a brief checklist to follow for each cut:


Now that you’re done drilling holes, now you have to perform a few small finishing tasks:
Using your favorite table saw, trim the artwork but leave a boarder. I’ve trimmed to a zero border but I don’t think it looks as good.
I happen to have a compressor nearby but you can use a can of air. Use these to blow all the dust out of your drill-work. This is important because of the next step…
I use black. Black and white seem to work well together. It doesn’t have to be an amazing, expensive, paint. Just something that will make the holes…well…black! Use a liberal amount and spray it from at least two different directions (from the top then from the bottom). And let it dry before…
I choose to sand the work before removing the masking tape. This ensure that you get rid of any burrs left from drilling and makes sure the tape comes off with sharp circles. Just sand down to the blue and it doesn’t have to be perfectly sanding. This is just a precaution if nothing more.


5 minutes
Now we’re ready to reveal your masterpiece!
Carefully pull back and remove your masking tape. If you pull in the right direction, it should come off in one piece.
VOILA! Looks great, doesn’t it!!??
Well mostly. Mine (the little girl in flowers) was a bit undercut so there are white blotches here and there. I’ll try again. But the girl (top of this project) came out perfect! With a little practice you’ll be turning these out in a storm … so long as each storm is 4-6 hours long!


1 minute
Here are a couple more words of wisdom:
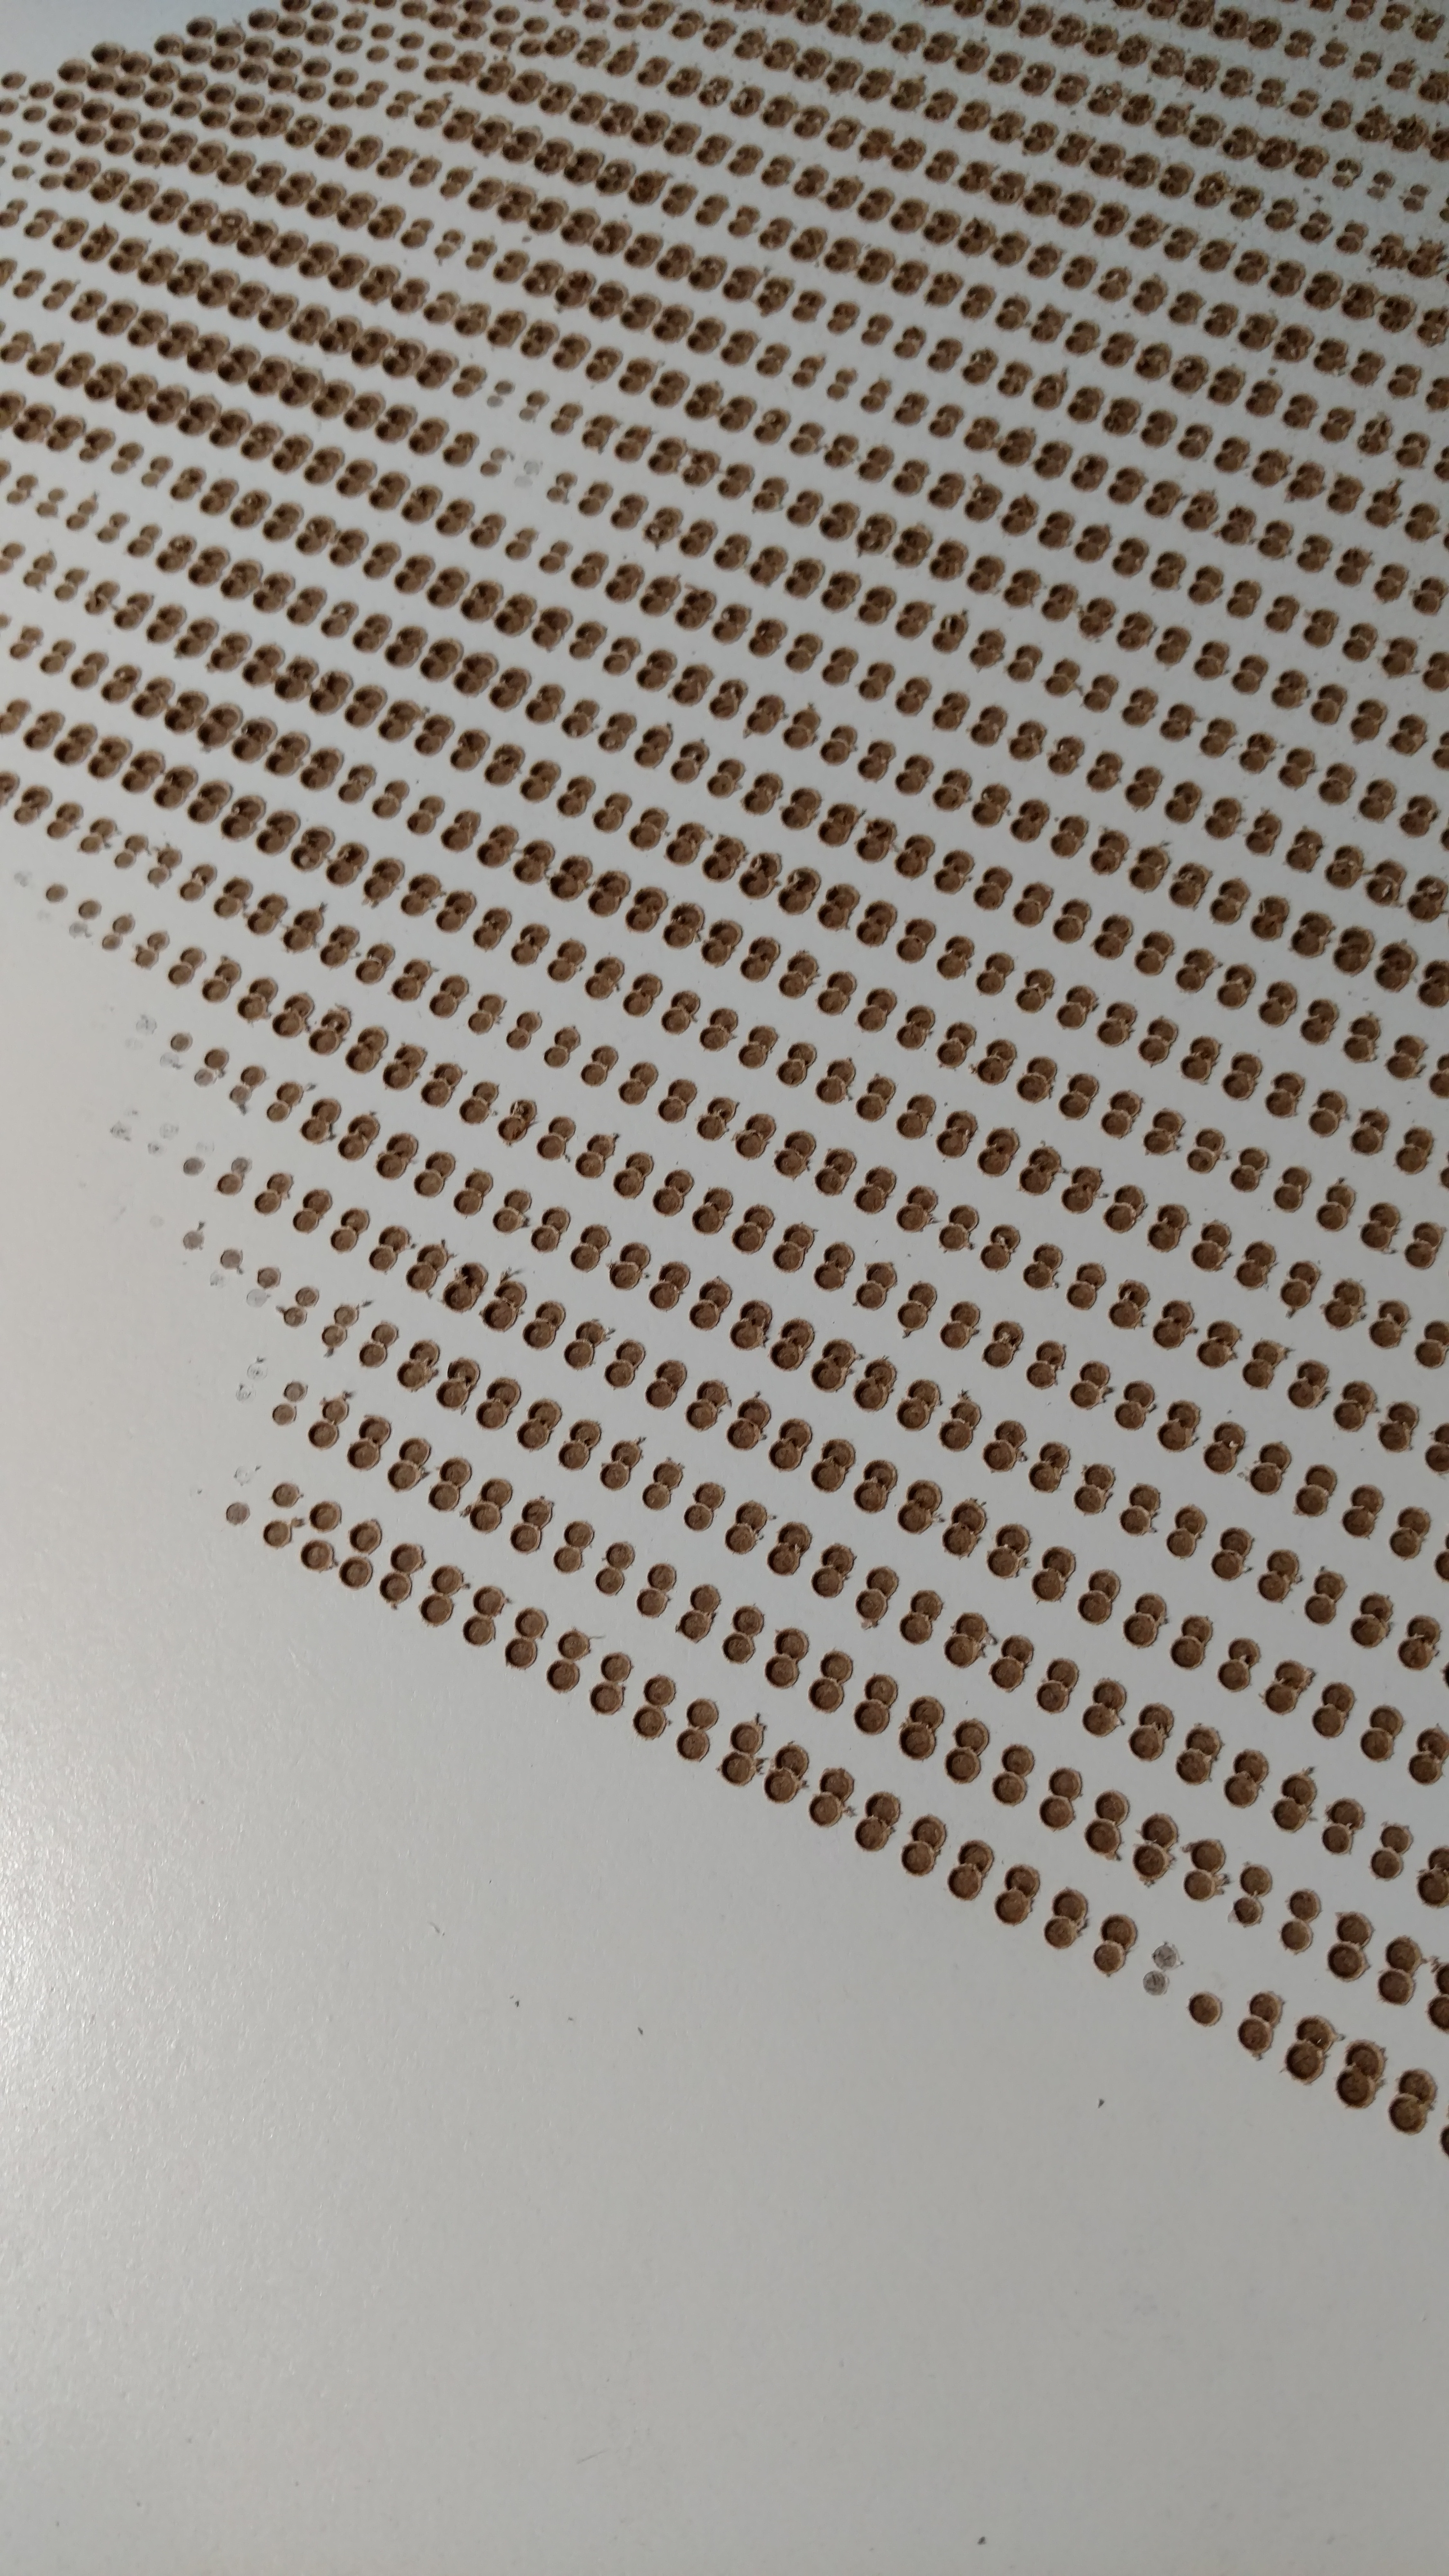
As you see in the image here, I had a problem with what I called ‘striping’. I didn’t know any better. The holes were coming out in diagonal groupings of two holes per strip. I couldn’t tell why until talking with Jason. He nailed it when he told me about backlash. This is the result of, essentially, something not being tight on your machine. It moves, say, in the X direction then settles back a little each time because something was loose. In my case, one of the pulley set-screws was loose on one of the motors. Tightening it cleared it right up!
If you choose to use Melamine, white board (same stuff) or some other pressed “cardboardy” like material, you may want to paint the edges of the final artwork BEFORE removing the masking tape. Of course, paint by hand, don’t spray them. You’d be surprised how much paint that cardboard absorbs before it starts to leave a nice coloring behind. Just be patient.
1 minute
I hope you find this tutorial useful and I am anxious to see your tips and tricks. I’m happy to correct anything here or add your own experiences as we do more of this type of work.
To Inventables:
Great machine! I’ve been happy thus far and plan on using it for many projects to come!!

Ben Ezzell
Jon Glazer
Jon Glazer
Jason Dorie
Jon Glazer
Albert Hill
Jon Glazer
Kevin Roberts
James Mikeworth
Jon Glazer
Kyle Slack
Hassan raza
Jon Glazer
Joseph Dunmire
casi m pourfarhadi
Jon Glazer
shawn mavity
Jon Glazer
shawn mavity
shawn mavity
Jon Glazer
Goran Ciganovic
Hany Heshmat
Andrea Jay
Paul D
LOTHAR HARRIS