Power Hour Challenge.
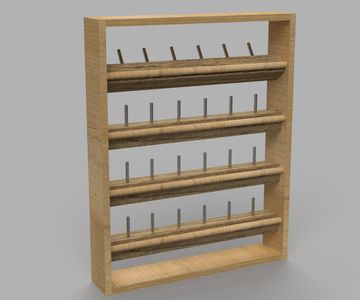
Small bit holder for 1/8" bits. Features 4 trays that pivot out so bits can be removed. Dowels that run along the back side stop trays from pivoting too far and add structural stability.
Modular design allows one to remove tray(s) if bits are longer.
30 minutes
Materials and Tools Needed:
1- Wood router bit, 1/8"
1- Wood router bit, 1/16"
1- Sheet of 1/4" thick Plywood at least 11″ × 9″
1- 1″ × 1″ × 48″ Preferably a hardwood (Maple or Oak)
1- 1/4″ × 48″ Dowel rod
Wood Glue
8 Small Nails
Small Drill bit (Around the same size as nails)
Sandpaper
Rubber Bands
Instructions:
1) Cut Plywood with Table saw or Circular Saw to at least 11″ × 9″
2) Cut 1×1 into 7.5" Pieces. (4 Total)
3) Cut Dowel into 7.75" Pieces (4 Total)
4) Drill small hole into the sides of 1×1s using small drill bit (For pivot point, so Center drill hole by drawing an “X” See 1×1_X_Pattern.PNG)
24 minutes
1) Side and Top Pieces 1/8" Bit
Clamp down plywood and cut the first page from Easel project page. (Should have the side and top pieces. Cuts have tabs and are intended to keep pieces stationary for next step)
2) Side Piece Holes 1/16" Bit
With same piece of plywood still clamped down change out bit for smaller bit (1/16")
Run Second Page from Easel project page.
3) Bit Holder Trays 1/16" Bit
Clamp down one of the 1×1 pieces and run 3rd page of Easel project page. (Drills out the holes for the bits)


1) Lay out all of the parts
(There should be 1 top, 1 bottom, 2 sides, 4 dowels and 4 Bit Holder Trays)
2) Make sure all of the parts fit together (See Project_Overview. PNG and Bit_Holder_Rear_View.PNG or PDF that is under Digital Files.)
3) Sand all of the rough edges.
4) Set Bit holder trays aside. They will be used at the end.
5) Apply a small amount of wood glue to dowel rod holes on side pieces (the recessed holes, not the trough holes) Insert Dowels.
6) Apply a small amount of glue to Top and Bottom tabs and slide into Side Pieces. Apply several rubber bands to hold Sides, Top and Bottom together.
7) Install Bit Holder Trays using nails.